
So, you're curious about embroidery? An embroidery kit for beginners is your perfect starting point—a neat little package with everything you need to jump into this timeless craft without any of the guesswork. Think of it as your all-access pass to creating something beautiful, designed to make your first go at it fun, relaxing, and totally successful.
Your Creative Journey Starts Here
Have you ever seen a gorgeous piece of hand-stitched art and thought, "I wish I could do that"? Well, you absolutely can, and a thoughtfully curated kit is where it all begins. It's like getting a recipe box for a beautiful project; all the essential ingredients are pre-measured and ready for you to start stitching up some creativity.

Consider this guide your friendly mentor. We’re here to demystify the whole process, showing you how to pick the right kit, get to know your new tools, and confidently make those first few stitches. The whole point is to focus on the joy of creating, not the stress of figuring out what supplies to buy.
What Makes Embroidery So Appealing
There's a reason embroidery is making such a huge comeback. It's so much more than just a craft; it's a practice in mindfulness. The gentle, repetitive rhythm of pulling a needle and thread through fabric has a wonderfully calming effect, helping to quiet a racing mind and melt away daily stress.
Beyond its zen-like qualities, embroidery gives you a real, tangible sense of accomplishment. In our fast-paced digital world, there's something incredibly satisfying about making something beautiful with your own two hands. You're connecting with a long tradition of artisans while also getting to express your unique style. Start with a pre-printed pattern, and soon you'll be designing your own art, from wall decor to personalized clothing. You can even design your own custom iron-on name tags to give your projects a truly signature touch.
Embroidery is about slowing down, calming your nervous system, making something beautiful, and adding a little playful elegance to your everyday surroundings. It’s about taking a design you love and experiencing it with your hands—one stitch at a time.
Why A Kit Is The Best Starting Point
Diving into a new hobby can feel a bit overwhelming at first. Which fabric is best? What size needle do I need? How many colours of thread should I get? A good embroidery kit for beginners makes all those questions disappear.
- All-in-One Convenience: Everything you need is right there in the box. You can start stitching the moment you feel inspired.
- A Guided Experience: Kits typically come with a pre-printed pattern on the fabric and clear instructions, giving you a roadmap for your first project.
- Learn as You Go: They are cleverly designed to teach you the foundational stitches in a practical, hands-on way.
- Cost-Effective: Buying a kit is almost always more affordable than sourcing all the supplies one by one.
Let's start this journey together. It's all about having fun and creating something you can be proud of from the get-go.
Unpacking the Magic in Your First Kit
Opening your first embroidery kit feels a little like Christmas morning, doesn't it? It’s this box full of promise and colour, just waiting for you to turn it into something amazing. But if you’ve never picked up a needle before, all those bits and bobs can look a bit intimidating.
Not to worry! Let's walk through what you'll find inside, so you know exactly what everything is for. Think of it as your creative recipe—every ingredient has a part to play.
Understanding these tools is the first real step. Once you know what you’re holding, you can relax and just enjoy the process of bringing your design to life.
Your Essential Stitching Toolkit
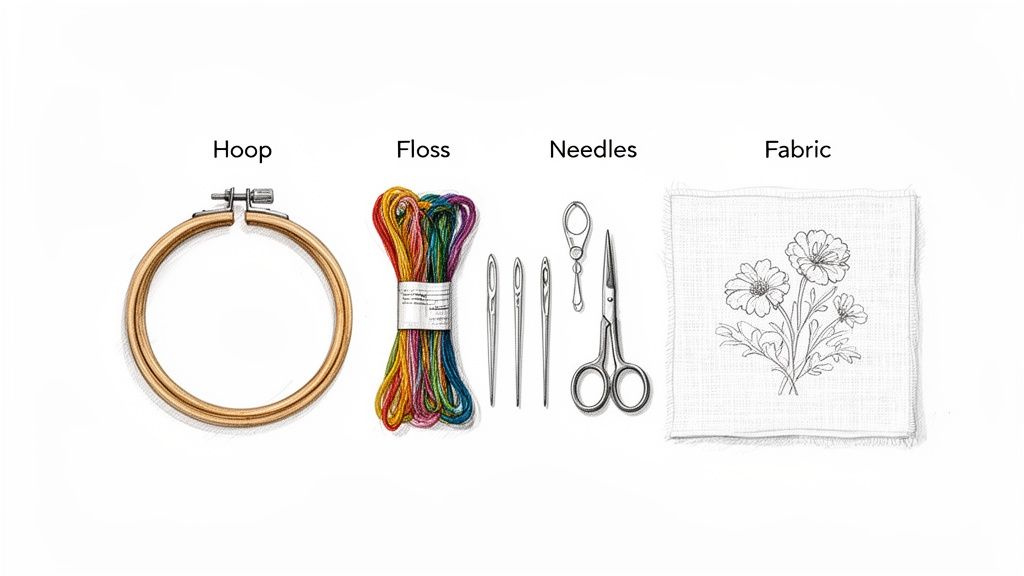
Most embroidery kits for beginners come with the same core supplies. While the specifics might change a bit from kit to kit, these are the trusty essentials you can almost always count on finding inside.
- Embroidery Hoop: This is your best friend for keeping things neat. The hoop, usually a wooden or plastic circle, holds your fabric perfectly tight while you work. It’s like a tiny drum for your fabric, preventing it from puckering and ensuring all your stitches look lovely and even.
- Fabric with a Pre-Printed Pattern: Here’s your canvas and your guide, all in one. The pattern is printed right onto the fabric, so there’s no guesswork. You can just jump straight into the fun part: stitching!
- Embroidery Floss: These are the beautiful bundles of colourful thread that will make your art pop. Floss is usually made of six individual strands twisted together. Your pattern will tell you exactly how many strands to use for each part of the design to get different effects.
- Needles: You'll notice these are a little different from a standard sewing needle. Embroidery needles have a larger eye to make threading that thicker floss much easier, plus a sharp point to glide smoothly through the fabric.
- Needle Threader: This little gadget is a total lifesaver, especially when you're just starting out. It's a simple tool designed to help you pull the floss through the eye of the needle without any squinting or frustration.
Think of your kit as a guided experience. Each tool is chosen specifically to remove barriers, allowing you to dive straight into the fun part—creating something beautiful with your own hands.
The Importance of Quality Materials
Let me tell you, the quality of the materials in a kit really, truly matters. It can be the difference between a relaxing, joyful experience and a frustrating one. Good-quality floss, for instance, won't knot up and fray as you stitch, and it’ll glide through the fabric like a dream.
Likewise, a solid, sturdy hoop will keep your fabric tension just right, which is the secret to getting that polished, professional look.
When a kit is put together with care, you get to focus on learning the stitches and enjoying yourself, not fighting with your tools. That’s why a good embroidery kit for beginners is such a worthwhile starting point. It sets you up for success right from that very first stitch and launches you into a wonderful creative journey.
How to Choose the Right Embroidery Kit
Walking into the world of embroidery can feel a bit like being a kid in a candy shop—so many colourful and exciting options! But don't let all that choice overwhelm you. Picking the perfect embroidery kit for beginners is really just about matching a project to your own style and what you hope to get out of it.
Think of it this way: are you looking for a quick, satisfying project you can knock out in an afternoon? Or are you hoping to sink your teeth into a new hobby that'll keep you happily stitching for a few weeks? Just answering that one question will help you narrow things down beautifully.
Start With the Design
The first thing you’ll notice is the massive range of designs out there. Some kits have simple, bold lines, while others are bursting with intricate floral details and dozens of colours. For your very first project, trust me: simplicity is your best friend.
Look for patterns with clearly defined sections and fewer tiny, fiddly bits. This lets you focus on getting the hang of the basic stitches without feeling rushed or frustrated. A kit that introduces just a few core stitches—like the backstitch and satin stitch—is the perfect place to start. You can always tackle the more complex patterns once your confidence is up.
Your first project should be an exciting and encouraging experience, not an intimidating test of skill. Choosing a simple, beautiful design sets you up for that amazing feeling of accomplishment that makes you want to keep stitching.
Match the Project Size to Your Available Time
Next up, consider the size of the project. Embroidery kits come in all shapes and sizes, from tiny little charms to big pieces of wall art. How much time do you realistically want to spend on your first piece?
- Small Projects (1–3 hours): Think keychains, ornaments, or little patches. These are perfect for a single relaxing evening and give you that awesome hit of instant gratification.
- Medium Projects (4–8 hours): This is where you’ll find most 4- to 6-inch hoop art, small tote bags, or cushion covers. These make for great weekend projects and let you practise your new skills without a huge time commitment.
- Large Projects (10+ hours): Larger wall hangings, detailed bags, or custom clothing pieces fall into this category. They're incredibly rewarding, but it’s probably best to save them until you have a project or two under your belt.
For most beginners, a small or medium project is the sweet spot. Finishing something quickly builds momentum and gets you excited to start the next one. For example, if making something useful is your goal, you could check out beginner projects like a plastic canvas bag craft kit, which teaches you basic construction right alongside the stitching.
Comparing Beginner Kit Features
To help you decide, here’s a quick comparison of different project styles. Use this to find what best fits your creative goals and the time you have for your new hobby.
| Kit Type | Ideal For | Time to Complete | Skills You'll Learn |
|---|---|---|---|
| Mini Hoop/Keychain | A quick, satisfying first project or making small gifts. | 1–3 hours | Basic stitches (backstitch, satin stitch), finishing small items. |
| Standard 6" Hoop Art | Creating a decorative piece and learning multiple stitches. | 4–8 hours | A wider variety of stitches, transferring patterns, hoop finishing. |
| Small Functional Item | Making something you can use, like a pouch or bag. | 5–10 hours | Practical stitching, basic assembly, working on different fabrics. |
| Clothing Customization | Personalizing a t-shirt, jacket, or hat with a simple design. | 3–6 hours | Stitching on clothing, working without a hoop (sometimes). |
Ultimately, the best kit is the one you can't wait to start!
Figure Out Your "Why"
Finally, ask yourself what you really want to get out of this. Your motivation can be a fantastic guide in picking the best embroidery kit for beginners. Are you stitching for a bit of relaxation, to create a handmade gift, or to seriously learn a new skill?
Your reason for starting will help you find a kit that just feels right. If you’re looking for a mindful activity, maybe choose a design with soothing colours and repetitive patterns. If you’re making a gift for a friend, pick something that reflects their personality—their favourite flower or animal, perhaps?
When you have a personal connection to the design, the whole process becomes so much more meaningful. This first choice isn’t just about picking a pattern; it’s about setting the stage for a joyful and fulfilling creative adventure. Choose a kit that makes you excited to pick up that needle and thread, and you're already on the right path.
Making Your First Stitches Step-by-Step
Alright, this is the moment you’ve been waiting for! It’s time for that colourful thread to meet the fabric and bring your design to life. Don't get hung up on making every stitch perfect right away. The real goal here is to have fun, pick up a new skill, and feel that incredible spark of pride that comes from creating something with your own two hands.
Think of this as our little stitch-along. We'll walk through the whole process together, from getting your thread ready to mastering three of the most essential stitches in all of embroidery. These are the foundational stitches you'll use time and time again in countless future projects.
Preparing Your Tools for Action
Before you even think about that first stitch, let's get everything set up for a smooth, tangle-free session. Taking a few moments to prep now will save you a world of frustration later on.
First things first, let's get your fabric into the embroidery hoop. Loosen the screw on the outer ring, pop the two rings apart, and drape your fabric over the inner one. Now, place the outer ring on top, press down firmly, and tighten that screw. You want the fabric to be taut, like a little drum—this tension is the secret to getting beautiful, even stitches.
Next up, the floss. Most embroidery floss is made of six individual strands twisted together. Your kit’s instructions will tell you how many you need for each part of the design, which is usually two or three for beginner patterns. To separate them, cut a piece of floss (about the length of your forearm is a good rule of thumb) and gently pull one strand out at a time. This little trick prevents a knotted mess! Once you've got your strands, thread your needle. Your trusty needle threader will make this part a breeze.
Mastering Three Essential Stitches
With your needle threaded and your fabric prepped, it's finally time to stitch. We're going to focus on three simple but incredibly versatile stitches that you'll find in almost every embroidery kit for beginners.
1. The Running Stitch This is probably the very first stitch anyone ever learns. It's fantastic for creating outlines and simple, decorative lines.
- How to Do It: Bring your needle up from the back of the fabric where you want your line to start. Push it back down a short distance away. That's one stitch! Come back up a little further along the line and do it again, leaving a small, even gap between each stitch. You're basically creating a dotted line with thread. Simple as that.
2. The Backstitch For a solid, unbroken outline, the backstitch is your best friend. It creates a strong, clean line that looks amazing for lettering and defining shapes.
- How to Do It: Start by making one simple running stitch. For the next stitch, bring your needle up through the fabric a stitch-length ahead of your first one. Now, instead of moving forward, you’re going to go backward, pushing your needle down into the very same hole where your first stitch ended. This connects them perfectly, creating a seamless line.
3. The Satin Stitch When you want to fill an area with solid, vibrant colour, the satin stitch is your go-to. It’s just a series of straight stitches laid neatly side-by-side.
- How to Do It: Bring your needle up on one edge of the shape you want to fill. Go straight across to the opposite edge and push the needle down. Come back up right next to where you started that first stitch and repeat the process. The trick is to keep your stitches snuggled up close together so no fabric shows through. Patience is the key here for that smooth, satin-like finish!
Here’s a handy flowchart that breaks down the key things to consider when picking out a kit, based on your style, the project size, and how much time you have.
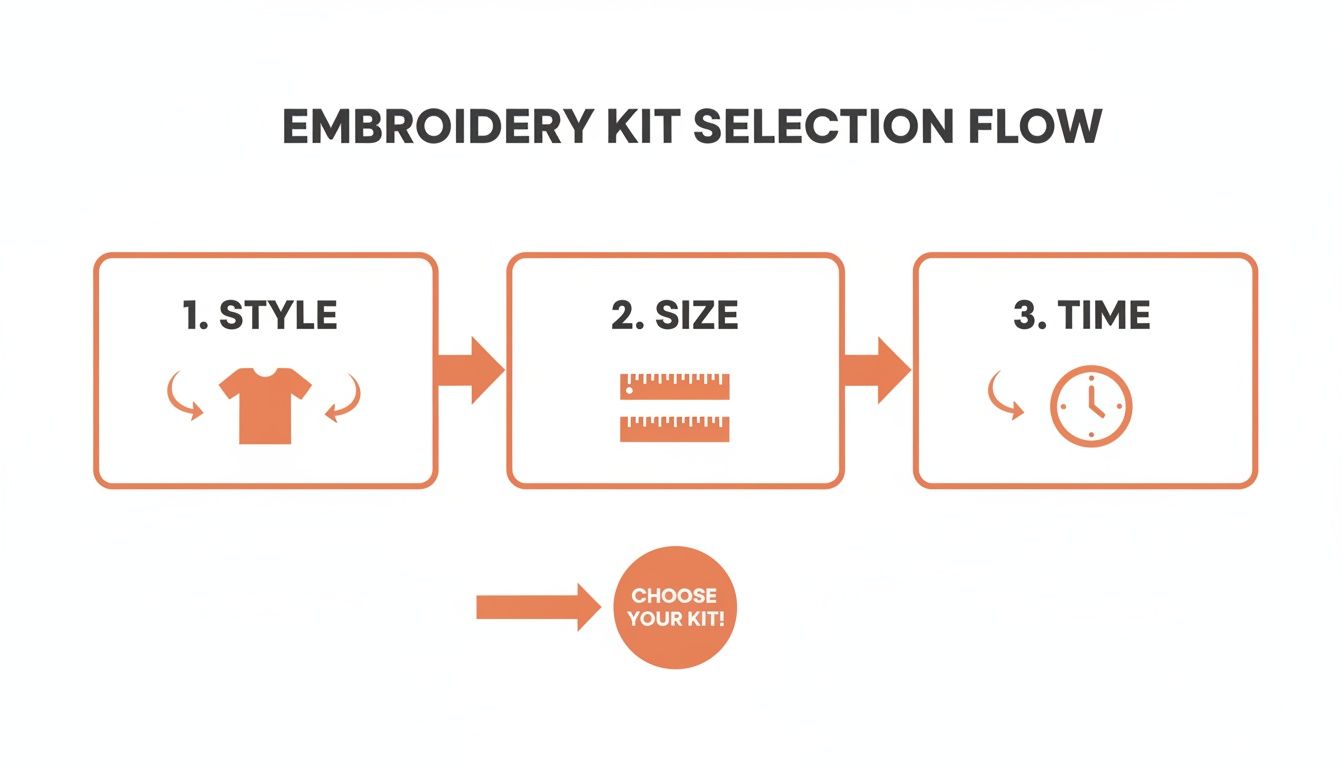
The flowchart really shows that a great first experience is all about matching the project to your personal creative goals.
Pro Tip: Want to keep the back of your work looking tidy? Try to avoid using knots. Instead, when you start, just leave a small tail of thread on the back. You can secure it by stitching right over it with your first few stitches. To finish off, simply weave your needle under a few stitches on the back before you snip the thread.
Remember, every single stitch you make is progress. Embrace the process of learning and don't be afraid to pull out a stitch if it doesn't look quite right. We've all been there! This first project is your practice canvas—a place to build confidence and discover just how joyful this craft can be. Before you know it, you'll have a finished piece you can be incredibly proud of.
Why Embroidery Is a Booming Creative Outlet
Embroidery is having a serious moment right now, and it’s about so much more than just a needle and thread. People from all walks of life are discovering that the simple, rhythmic act of stitching is the perfect antidote to our fast-paced, always-on world. It’s a chance to slow down, disconnect from your screen, and make something real and beautiful with your own two hands.
Think of it as active mindfulness. The gentle focus it takes to pull a needle through fabric has a wonderfully calming effect. It helps quiet a racing mind, melt away stress, and even sharpen your concentration. Each stitch is a small, deliberate movement that anchors you in the present, making it a meditative escape from daily pressures.
A Modern Craft with Deep Roots
Sure, embroidery has been around for centuries, but today's revival feels completely fresh and new. Crafters are putting their unique spin on everything, adding custom stitches to denim jackets, ball caps, and even sneakers. It’s this incredible blend of timeless skill and modern self-expression that really draws people in.
A huge part of this boom comes down to the amazing embroidery kits for beginners now available. They take all the guesswork and intimidation out of getting started. No more wandering the craft store wondering what you need! These kits provide a perfect, guided entry point into the hobby.
This accessibility is fuelling some serious growth. The Canadian embroidery market, for instance, is projected to capture 10.38% of the North American share in 2025, which adds up to about $131.3 million. A lot of that surge is thanks to beginner-friendly DIY kits making it easier than ever to pick up a needle and thread. You can dig deeper into these exciting market trends in embroidery to see the full picture.
More Than Just a Hobby
Beyond the creative satisfaction and calming benefits, embroidery connects people. The online world is buzzing with vibrant communities where stitchers share their latest projects, swap tips, and cheer each other on.
Embroidery is about taking a design that you love and experiencing it with your hands—one stitch at a time. It’s about slowing down, calming your nervous system, and making something beautiful.
This shared passion builds real connections. Whether you join a Facebook group, follow an artist on Instagram, or find a local crafting circle, you instantly become part of a supportive and friendly network. It turns what could be a solo activity into a wonderful shared experience.
It's this powerful combination of benefits that has so many people hooked. Embroidery gives you:
- Stress Relief: A proven way to relax and unplug.
- Creative Expression: A canvas to show off your personality.
- Tangible Accomplishment: The unbeatable feeling of finishing a project you made yourself.
- Community Connection: A way to meet and bond with fellow craft lovers.
Embroidery isn’t just about the finished piece you hang on the wall—it’s about the whole enriching journey. It’s a chance to connect with yourself, with a timeless art form, and with a fantastic community of makers.
Your Beginner Embroidery Questions Answered
When you first dive into embroidery, it’s totally normal for questions to bubble up. You've got your hoop, your needle, and a rainbow of floss—it's an exciting moment, but it can also feel a little bit uncertain. Don't worry, we've all been there!
Think of this as your friendly go-to guide for those little "am I doing this right?" or "what if...?" moments. Getting these common questions sorted out right from the start will help you relax, have fun, and enjoy the process so much more.
What Is the Easiest Type of Embroidery for a Beginner?
For anyone just starting out, my best advice is to grab an embroidery kit for beginners that comes with a pre-printed pattern. This is a game-changer because the design is already stamped right onto the fabric, giving you a clear roadmap to follow. You get to skip the sometimes-fiddly step of transferring a pattern and jump straight into the fun part: learning the stitches.
You'll want a kit that focuses on just a few basic, foundational stitches—like the backstitch for outlines and the satin stitch for filling in shapes. Starting with smaller projects is also a fantastic idea.
- Ornaments: They work up quickly and make seriously charming handmade gifts.
- Patches: A super fun way to personalize a denim jacket or a tote bag.
- Keychains: A small, satisfying project you can easily finish in an evening.
There’s nothing quite like the feeling of finishing your first piece. Completing something small gives you that wonderful sense of accomplishment, which is the best motivation to pick up your hoop and start your next creation.
How Do I Keep the Back of My Embroidery Neat?
Ah, the age-old question! A tidy back is a great habit to get into, and it's much easier than you might think. While it's true no one but you will see it, keeping the back neat helps prevent your threads from snagging later and stops dark colours from peeking through to the front. The real secret? Ditching bulky knots.
Instead of tying a knot to start, try this little trick: leave a small tail of thread (about an inch) on the back of your fabric. As you make your first few stitches, make sure you're stitching right over that tail. This locks the thread in place perfectly, no lump required.
When you're ready to end a thread, just weave your needle under three or four existing stitches on the back and then snip the floss close to the fabric. It's also a good idea to avoid carrying your thread across large empty areas on the back of your design—it’s much neater to end the thread and start fresh in the new spot.
Can I Wash My Finished Embroidery Project?
You absolutely can, but it needs a little bit of gentle care to keep your handiwork looking its best. The golden rule is to always hand wash your finished piece in cool water with a very mild soap. A washing machine can be too rough, potentially pulling your stitches or causing the colours to bleed.
Here's a simple and safe way to do it:
- Let your piece soak in cool, soapy water for about 15 minutes.
- Gently swish it around. Whatever you do, don't rub, scrub, or wring it out!
- Rinse it carefully under cool running water until the water runs clear.
- To dry it, lay the piece flat on a clean, thick towel. Roll the towel up like a burrito and press gently to soak up the extra water.
- Finally, unroll it and let it air dry completely on a new, dry towel.
If you need to iron out any wrinkles, do it from the back on a low setting while the fabric is still a tiny bit damp. Placing it face down on another towel gives your stitches a soft cushion so they don't get squashed flat.
One of the biggest mistakes is using hot water. It can make both the fabric and the floss shrink or bleed. Stick with cool water—it's the safest bet for protecting all your hard work.
What Should I Do If I Make a Mistake?
First things first: take a deep breath and don't panic! Everyone makes mistakes, even stitchers who have been doing this for decades. A wonky stitch isn't a disaster; it’s just part of the creative process and almost always fixable.
If a single stitch has gone rogue, you can usually just use the tip of your needle to gently pull it out. For a larger section that needs redoing, carefully use your needle or a small pair of scissors to snip the stitches and pull them out one by one. The trick is to be patient and gentle so you don't distort the fabric.
Remember, embroidery is supposed to be relaxing! Try to see a mistake as a chance to learn, not a reason to get frustrated. If you feel your shoulders tensing up, it's perfectly fine to put your project down for a while and come back with fresh eyes. Sometimes, you can even turn a mistake into a happy accident—a new little star in the sky or a freckle on a flower. It's all part of the journey. And for those curious about other hands-on crafts, our guide on how to use a leather craft kit shares that same rewarding feeling of creating something beautiful with your own two hands.
Here at Stitch Mingle, we believe creativity should be joyful and open to everyone. Our beginner-friendly embroidery and craft kits are designed with you in mind, packing in everything you need—from quality materials to step-by-step video tutorials—to create something you'll truly be proud of. Explore our collection and start your creative journey today at https://stitchmingle.com.
