
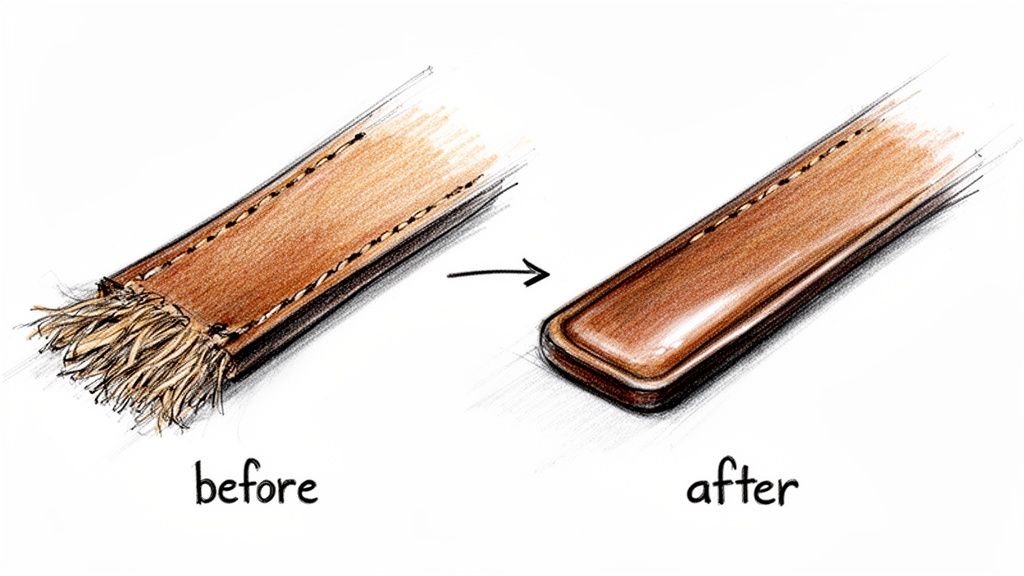
Finishing a leather edge is that final, magic touch that takes a project from "homemade" to "hand-crafted." It's the process of taking that raw, fuzzy edge, sanding it smooth, rounding the corners, and then sealing all those fibres together with a bit of burnishing or a coat of edge paint. This one detail doesn't just look good—it adds durability and makes the whole piece feel incredible.
The Secret to Professional-Looking Leather Crafts
Ever look at a high-end leather bag or wallet and wonder what gives it that polished, store-bought look? More often than not, it's the edges. A rough, unfinished edge can make even the most perfect stitching look a bit clumsy. On the other hand, a slick, glossy edge feels amazing in your hand and signals true quality.
Learning how to finish leather edges properly is one of the most satisfying skills you can develop as a crafter. It's what separates a wallet that starts fraying after a year from one that builds a beautiful character over a decade. Think of this guide as your friendly workshop companion, here to help you nail this essential technique.
Why Perfect Edges Matter So Much
Getting those edges just right isn't just about looks; it serves some really practical purposes that boost the quality and lifespan of your work.
- Increased Durability: When you seal an edge, you're locking the leather fibres together. This stops them from fraying, splitting, or soaking up moisture that could weaken the leather over time.
- Professional Appearance: Clean, polished edges are the calling card of high-quality leatherwork. It’s a detail that instantly makes your creations look more valuable and expertly made.
- Improved Feel: Nobody likes a scratchy edge. Smooth edges are comfortable to hold and handle, which is a huge deal for things you touch all the time, like belts, wallet pockets, or bag straps.
In fact, data from handmade markets suggests that a well-finished edge can boost a project's perceived value by as much as 35%. This is especially true in craft-loving hubs across North America, which are part of the massive $268 billion U.S. handmade industry.
Taking the time to properly finish your edges is an investment. It’s a quiet detail that speaks volumes about your commitment to quality and craftsmanship.
Whether you're starting with a simple project like one of our beginner-friendly keychains or tackling a custom tote bag, mastering this skill will make your work stand out. We're going to skip the confusing jargon and get straight to simple, practical advice that you can actually use.
Your Essential Toolkit for Perfect Edges
Getting started with edge finishing is way less intimidating than it looks, and you definitely don't need a workshop full of expensive gear. Honestly, having the right handful of tools is what makes the process go from a chore to something truly satisfying. Let's walk through the core items you'll want on your bench and I'll explain why each one is a game-changer.
Think of the whole process in three simple stages: shaping, smoothing, and sealing. For that first shaping stage, your absolute best friend is an edge beveler. This little hand tool is designed to shave off the sharp, 90-degree corners of your leather. This creates a slightly rounded profile that’s so much easier to burnish into that smooth, durable finish we’re all after. If you skip this, you’ll just be fighting with a stubborn, square edge.
Creating a Smooth Foundation
Once you’ve knocked off those sharp corners, the next goal is to get the edge as smooth as humanly possible. This is where a bit of sanding comes into play, and you don’t need anything fancy.
- Sandpaper or Sanding Blocks: I always start with a medium grit, something around 220-320, to tame any major fuzziness and get the edge nice and level. After that, I’ll switch to a finer grit like 400 or even 600 to create a silky-smooth surface that’s perfectly prepped for burnishing.
- A Firm Surface: Here's a tip that makes a huge difference: always sand on a hard, flat surface. This simple trick ensures you're creating an even, consistent edge, not one that's accidentally wavy or too rounded.
Getting this prep work right is everything. A beautifully sanded edge is the real secret to achieving that glassy, professional look when you learn how to finish leather edges. If you're just getting your feet wet in leatherwork, you might also find our guide on how to sew leather by hand super helpful for nailing down other key skills.
The Burnishing and Sealing Stage
Okay, this is where the magic really happens. Burnishing is all about using friction to compress and polish the leather fibres together, which creates that sealed, glossy edge that looks so good.
For this step, you’ll need a burnishing compound and something to create friction. Gum Tragacanth is the classic, all-natural choice that crafters have used for generations. Another fantastic option is Tokonole, a popular Japanese cream famous for giving a super fast, high-gloss shine. You only need a tiny dab of either one.
To get that friction going, you can use:
- A Wooden Slicker: This is a simple wooden tool with grooves sized for different leather thicknesses. It’s designed specifically to make burnishing comfortable and really efficient.
- A Piece of Canvas: Don't underestimate this one! A small scrap of heavy canvas or even an old piece of denim works wonders. The texture is just right for generating that gentle heat and polishing the edge to a brilliant lustre.
Pro Tip: My best advice is to work in small, quick sections. Applying brisk, consistent pressure with your slicker or canvas generates just enough heat to melt the burnishing compound into the fibres. This creates a tough, water-resistant seal that will last.
To make things even clearer, I've put together a quick-reference table comparing these essential items. It should help you figure out exactly what you need to get started on your first few projects.
Comparing Your Edge Finishing Tools and Compounds
| Tool/Material | Primary Use | Best For | Beginner Friendliness |
|---|---|---|---|
| Edge Beveler | Rounding sharp corners for a smooth profile | All vegetable-tanned leather projects | ★★★★★ |
| Sandpaper | Smoothing and removing fuzz from the edge | Preparing edges for burnishing or painting | ★★★★★ |
| Gum Tragacanth | Traditional compound for burnishing edges | Achieving a natural, classic burnished look | ★★★★☆ |
| Wooden Slicker | Applying friction to polish and seal the edge | Consistent results on straight or curved edges | ★★★★★ |
This little comparison should give you a solid starting point. As you get more projects under your belt, you’ll quickly figure out which tools and compounds become your personal favourites.
Mastering the Classic Burnished Edge
If you want that timeless, glossy finish on your vegetable-tanned leather, burnishing is the way to go. It’s a classic, hands-on technique that feels incredibly satisfying, and frankly, it’s a cornerstone skill in leatherwork. The whole process boils down to one simple thing: friction.
You’re essentially using a burnishing agent and some good old-fashioned elbow grease to generate a little bit of heat. This heat works its magic, compressing the leather fibres and locking them together into a smooth, dark, and often beautifully shiny surface. It’s a rustic, professional look that also protects the edge from fraying and moisture. But before you even reach for the burnishing compound, remember that great edges are built on great prep. Sanding and bevelling aren't optional steps; they're the foundation for a flawless result.
Your Step-by-Step Burnishing Guide
Alright, let's get into it. Start by lightly dampening the edge with a bit of water—a small sponge or a dauber works perfectly. You're not looking to soak the leather, just make it damp enough to be workable. This touch of moisture helps the fibres lie down flat once you start applying pressure.
Next, apply a thin, even coat of your chosen burnishing compound. Whether you’re using Gum Tragacanth, Tokonole, or just a block of beeswax, remember that less is more. One of the most common beginner mistakes is slathering it on, which just creates a goopy mess. All you need is a light film to lubricate the fibres.
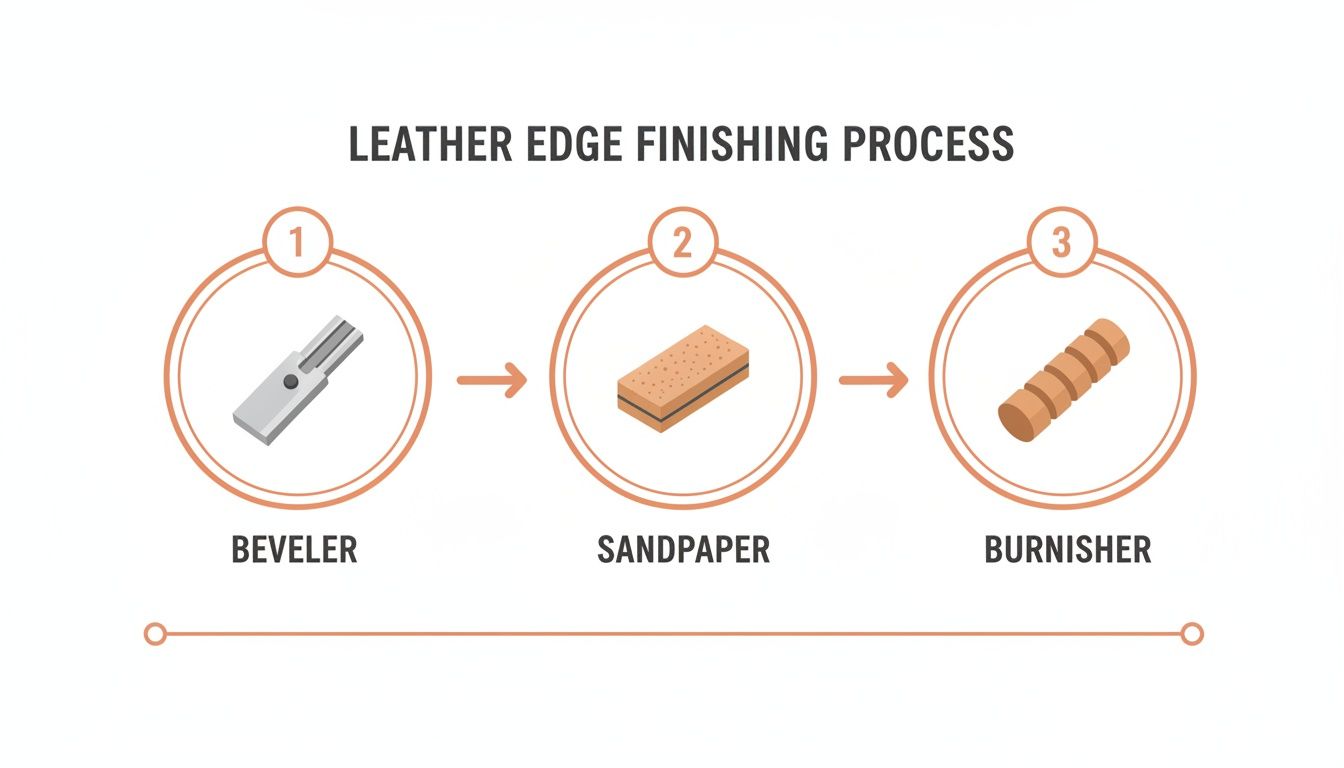
As you can see, the real work happens before the final polish. The process flows from shaping the edge with a beveler to smoothing it out with sandpaper, all leading up to the final burnish.
Now, grab your wooden slicker or a scrap of heavy canvas. Start rubbing the edge back and forth with firm, brisk strokes. You’ll feel a little drag at first, but as the heat builds, the surface will start to get slick and polished. Keep at it until you see a nice shine develop and the edge feels perfectly smooth to the touch.
Tips for a Perfect, Glassy Shine
Getting a truly exceptional burnished edge is more about finesse than force. It’s the little details that really elevate the final look.
The secret to a great burnish isn't brute force; it's consistent, brisk movement. The goal is to generate just enough heat to melt the compound and seal the fibres, not to crush them.
Think of it like polishing a good pair of shoes—quick, light strokes work much better than slow, heavy pressure. I always like to finish with a few passes in just one direction. This helps lay down all the tiny leather fibres uniformly, which really bumps up the gloss. If the first pass doesn't give you the shine you're after, don't hesitate to do it again.
- Don't Be Afraid to Re-sand: Still see some fuzz after your first burnish? Let the edge dry out completely. Give it a light sanding with a high-grit paper (think 600-800 grit), then re-apply your compound and have another go.
- Work in Sections: Trying to burnish a long strap all at once is a recipe for frustration. The compound will dry out before you get to the end. Instead, focus on 4-6 inch sections at a time to keep everything consistent.
- The Canvas Trick: A wooden slicker is great, but my secret weapon for that final buff is a simple piece of canvas or denim. Its texture is just right for bringing out that last bit of high-gloss polish.
It takes a little practice to get the feel for it, but once you master this method, you'll be creating stunning, professional-grade edges entirely by hand.
Using Edge Paint for a Clean, Modern Finish
If you're after that sleek, contemporary look you see on high-end handbags, edge paint is the way to go. It's also your best friend when working with chrome-tanned leathers, which famously refuse to burnish nicely. This technique creates a smooth, colourful, and perfectly sealed edge that almost looks like a seamless piece of plastic. It's a fantastic way to add a pop of colour and a flawless, modern vibe to your work.
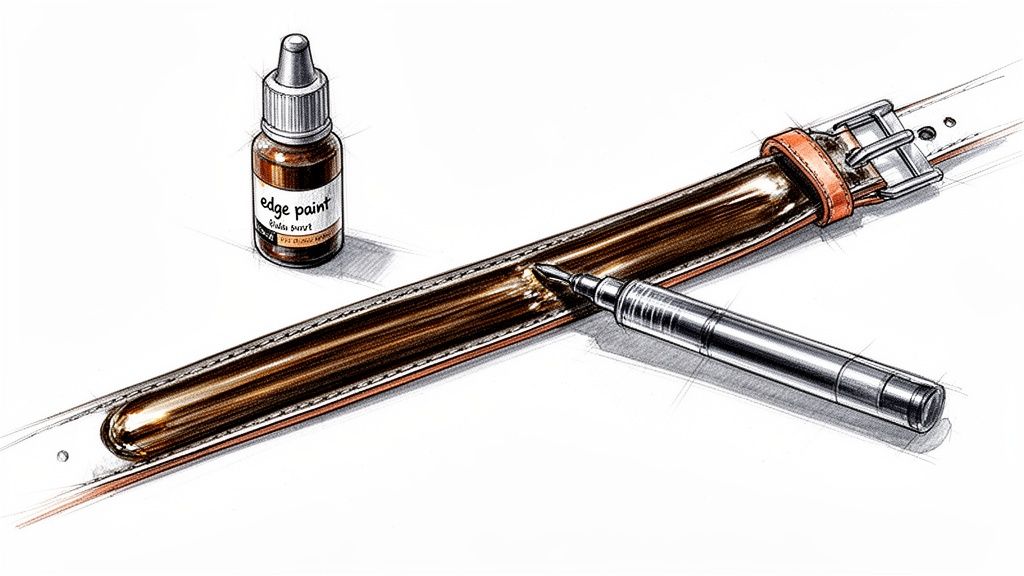
Unlike burnishing, where you're polishing the leather's own fibres, edge paint builds a flexible, durable coating right on top of them. The secret to a perfect application isn't a single thick coat; it's all about several thin, patient layers. Trying to rush this is the number one reason for cracks, peels, and an amateur-looking finish.
Prepping the Edge for Paint
Just like painting a wall in your house, the prep work you do here is 90% of the battle. You absolutely need a smooth, clean surface for the paint to stick properly. If you just slap paint over a fuzzy or uneven edge, all those little imperfections will telegraph right through and weaken the bond.
Start by sanding the edge with medium-grit sandpaper, something around 220-320 grit, to knock down any high spots and tame that initial fuzz. Once it feels more uniform, switch to a finer grit, like 400 or 600, to really smooth things out. Don't forget to bevel the edges slightly! That subtle rounded profile helps the paint flow beautifully over the corners for a much cleaner look.
The most crucial step? Make sure the edge is completely free of dust and oils before you even think about opening the paint. A quick wipe with a clean, dry cloth is usually all it takes to create the perfect canvas for your first coat.
The Art of Layering Edge Paint
With your edge perfectly prepped, you're ready for paint. You've got a few options for applicators—a roller pen, a fine-tipped brush, or even a simple awl can give you amazing control. No matter what tool you choose, the goal is to apply a very thin, even layer.
- First Layer: Think of this as your primer. It's going to sink into the leather fibres and might look a bit transparent or patchy. Don't worry, that's totally normal.
- Let It Dry Completely: This is where patience really pays off. Let that first coat dry thoroughly, which can take anywhere from 15 to 30 minutes, depending on the paint and the humidity.
- Sand Lightly: Once it's bone dry, give the surface a very light sanding with high-grit sandpaper (600-800 grit). This smooths out any tiny bumps and creates a bit of "tooth" for the next layer to grab onto.
- Repeat the Process: Wipe away the sanding dust and apply your next thin coat. Keep repeating this cycle of painting, drying, and sanding 2 to 4 times. You'll know you're done when you have a smooth, opaque, and beautifully uniform edge.
This meticulous, layered approach is what separates good edge work from truly great edge work. The result is a durable, flexible finish that won't crack under pressure. In craft-focused regions like California, where 15% of national craft sales occur, mastering techniques like this has helped hobbyists sell 30% more items on popular platforms. Properly finished edges are also proven to reduce wear by up to 40% over time, adding significant value and longevity to your creations.
For those just starting out, the complete set of tools included in our all-in-one leather craft kits can simplify this process immensely. Once you’re happy with the colour and smoothness, you can even apply a final clear topcoat for extra protection and to get that perfect matte or glossy look you're after.
How to Fix Common Edge Finishing Mistakes
Every leatherworker, from the seasoned pro to the weekend hobbyist, has those moments of frustration. You've followed all the steps, but something just isn't right with your edges. The good news? Most of these hiccups are completely fixable and offer a great chance to refine your technique.
Let's walk through some of the most common edge finishing problems and how to solve them.
What to Do When Your Burnished Edges Stay Fuzzy
One of the most frequent complaints I hear is about a burnished edge that just refuses to get that slick, glassy shine. You’ve slicked it, you’ve rubbed it, you’ve put some serious elbow grease into it, but it still looks fuzzy.
Nine times out of ten, the problem isn't your burnishing technique—it's the prep work. If the leather fibres weren't sanded down properly to begin with, you're essentially just polishing a rough surface.
The fix requires a bit of backtracking, but it's straightforward. Let the edge dry completely, then grab your sandpaper again. Start with a medium grit, something around 320, to really knock down those stubborn fuzzy bits. Then, switch to a finer grit like 600 or even higher until the edge feels incredibly smooth to the touch. Once that's done, you can re-dampen the edge, re-apply your burnishing compound, and give it another go. This second round of sanding is almost always the magic bullet.
Occasionally, the leather itself is the culprit. Softer leathers, especially from the belly area of a hide, have a much looser fibre structure that can be a real pain to tame. If you've sanded meticulously and still can't get results, you might need to bring in a light coat of a hardening agent to help lock those fibres in place before you burnish.
A fuzzy edge isn't a failure; it's feedback. It’s your project telling you to spend a little more time on your sanding. Mastering this is the key to learning how to finish leather edges like a pro.
Fixing Edge Paint That Cracks or Peels
Edge paint can give you a beautifully clean, modern finish, but it comes with its own set of potential headaches. The biggest one? Seeing your perfect paint job start to crack or peel away. This almost always means the paint didn't get a solid grip on the leather in the first place.
This usually boils down to one of two issues: you didn't prep the edge properly, or you applied the paint way too thickly.
Just like with burnishing, a perfectly clean and smooth surface is non-negotiable. If you painted over a dusty, oily, or unsanded edge, the paint just can't stick. The only real solution is to carefully sand off the failed paint, give the edge a thorough cleaning, and start fresh.
To prevent this from happening again, keep these tips in mind:
- Always sand first. This creates a smooth foundation with just enough texture for the paint to grab onto.
- Apply thin coats. This is critical. Thick, gloopy layers can't flex with the leather, which causes them to crack under stress. Several thin layers are far stronger and more durable.
- Be patient with drying times. Rushing between coats is a surefire way to get a weak bond that will fail down the line.
Putting in the effort to finish your edges properly is always worth it, especially on smaller items. For crafters making small goods, a great finish can boost the item's durability by as much as 45%. It's not just about looks; a well-finished product can also see its perceived value increase by up to 35%. You can explore more about the value of quality finishing in the handmade market.
By learning to troubleshoot these common issues, you'll not only save your projects from the scrap pile but also build the confidence to create pieces with truly professional, long-lasting edges.
Got Questions About Finishing Your Edges? I've Got Answers.
No matter how clear the instructions are, you're always going to have questions when you're trying something new. It's just part of the process! Finishing leather edges has its own set of little quirks and "what-ifs," so let's walk through some of the most common ones I hear from fellow crafters.
Think of this as your personal troubleshooting guide. A quick-reference to help you get unstuck and back to creating those beautiful, polished edges you're after.
Tokonole vs. Gum Tragacanth: What's the Real Difference?
Ah, the great burnishing debate! This is probably the number one question I get asked. Both are fantastic water-based burnishing compounds designed to slick down the fibres of veg-tan leather, but they do have slightly different personalities.
- Gum Tragacanth: This is the old-school classic. A natural gum that has been the go-to for generations of leatherworkers for a good reason. It does an excellent job of taming fuzzy edges and creating a smooth, durable finish.
- Tokonole: This is a hugely popular Japanese alternative that many crafters, myself included, have fallen in love with. It's known for producing a ridiculously smooth, almost glassy finish, and often feels like it gets you there a bit faster. Many find it slicks edges more quickly and adds a touch more water resistance.
Honestly, as a beginner, you'll get great results with either one. But if you're chasing that super high-gloss shine right from the start, Tokonole often has a slight edge.
Can I Finish the Edges of Any Kind of Leather?
This is a big one, and knowing the answer will save you a world of frustration. The short answer is no—not all leather is made for the same kind of edge finishing.
The classic burnishing technique we've been talking about works its magic on vegetable-tanned (veg-tan) leather. The unique tanning process leaves the fibres in a state where friction and compression can polish them into a hard, sealed edge.
On the other hand, chrome-tanned leather, which is often much softer and more flexible (think handbag or upholstery leather), just won't burnish. You can rub it all day, but the edge will just stay fuzzy. For chrome-tan, edge paint is your best friend. It creates a flexible, colourful coating that gives you that clean, modern look. Knowing your leather is half the battle.
Understanding the fundamental difference between veg-tan and chrome-tan leathers is a game-changer. It dictates your entire approach to edge finishing and is a core piece of leathercraft knowledge.
How Many Coats of Edge Paint Do I Really Need?
The secret to a flawless, professional-looking painted edge isn't slapping on one thick coat. That's a surefire way to get cracks and peeling down the road. The real trick is to build it up with multiple thin layers.
I always aim for 2 to 4 thin coats for a durable, smooth finish. It's a game of patience:
- Apply a thin base layer and let it dry completely.
- Gently sand it with a high-grit sandpaper (somewhere around 600-800 grit is perfect).
- Wipe away the dust.
- Repeat the process with another thin layer until you've got a smooth, solid colour.
Trying to rush this step will only result in drips and an uneven surface. Patience truly is your best tool here.
Do I Need Expensive Power Tools for a Good Finish?
Absolutely not! While a Dremel with a burnishing attachment can certainly speed things up (especially if you're making a bunch of long belts), you can get a stunning, high-gloss finish entirely by hand.
A simple wooden hand slicker, a scrap of canvas, and a bit of good old-fashioned elbow grease are all you truly need. In fact, working by hand often gives you more control over the pressure and heat, which is a massive advantage when you're just learning to feel how the leather responds. Great results come from good technique, not expensive gear.
Ready to put these tips into practice with a fun, rewarding project? The curated kits from Stitch Mingle include all the premium materials and easy-to-follow video guides you need to create beautiful leather goods with perfectly finished edges from your very first try. Explore the collection at https://stitchmingle.com and start your crafting journey today.
