
So, you’re ready to dive into the world of hand-sewn leather. It's an incredibly satisfying craft, and I'm here to show you just how approachable it can be. Forget any ideas about needing a massive workshop or complicated machinery. At its heart, leatherworking is about a few good tools, a bit of patience, and a time-honoured technique.
We're going to break it all down into four main stages: getting your gear together, prepping the leather, stitching it up, and adding those final, professional-looking touches. The whole process hinges on a simple idea: you make the holes first, then you stitch. It’s this method, using two needles and a special stitch, that creates a seam so much stronger than anything a machine can produce.
Your Journey Into Hand-Sewn Leather Starts Here
Welcome. Seriously, welcome. There's a special kind of magic in turning a flat piece of leather into something beautiful and functional. It’s a meditative process, a real escape from the digital noise of everyday life. You get to create something tangible, something that will last for years and tell a story.
Lots of folks get put off, thinking it's too complicated or expensive. But honestly, that’s a myth. With a handful of essential tools and some solid guidance, you can be making gorgeous, professional-quality items in no time. This guide is all about cutting through the confusion and getting you straight to the good part—transforming you from a curious beginner into someone who can confidently tackle their first project.
Why Choose Hand Sewing Over a Machine
Sure, a machine is fast, but when it comes to leather, speed isn't everything. A hand-sewn seam offers a level of strength and character that a machine just can’t replicate. It all comes down to the stitch.
- Unmatched Durability: We’ll be using the saddle stitch, the gold standard in leatherwork. Each stitch is essentially a knot, completely independent of the next. If one thread somehow wears through years down the line, the rest of the seam stays locked in place. A machine's lockstitch, on the other hand, creates a chain—if one link breaks, the whole thing can quickly unravel.
- Artisanal Aesthetic: That classic, slightly slanted stitch line you see on high-end leather goods? That's the saddle stitch. It’s an unmistakable sign of quality and true craftsmanship, a visual promise that something was made with care.
- Total Control: When you’re sewing by hand, you are in complete command. You control the tension and the placement of every single stitch. This is a huge advantage, especially when you're working on smaller items or navigating tricky corners where a clunky machine just can't go.
The real beauty of hand sewing is in its simplicity and strength. You are creating an item built to last for decades, not just a season. It’s a skill that connects you to a tradition centuries old, yet the results feel incredibly modern and personal.
This guide will focus on teaching you that timeless saddle stitch, making sure your very first project has the integrity and style of something made by a pro. By starting with something simple, you'll nail the fundamentals and build a solid foundation for more ambitious projects later on. For a great first project, you can learn more about how to make keychains in our detailed guide—it's the perfect entry point into this rewarding hobby.
Gathering Your Essential Leatherworking Tools
Before you can pull off that first perfect stitch, you need to get your hands on the right gear. Walking into the world of leatherworking tools can feel a little overwhelming at first, almost like learning a new language, but I promise it's simpler than it looks. Don't think of it as a huge expense—think of it as a small investment in a seriously rewarding skill. Let's break down the absolute must-haves that will take you from curious beginner to confident crafter.
The point isn't to buy every tool under the sun. It's about getting the right tools for the job, understanding why each one is important, and starting with a solid foundation. This is where you really start learning how to sew leather by hand the right way.
Here's a quick rundown of the gear that will make your first project a success.
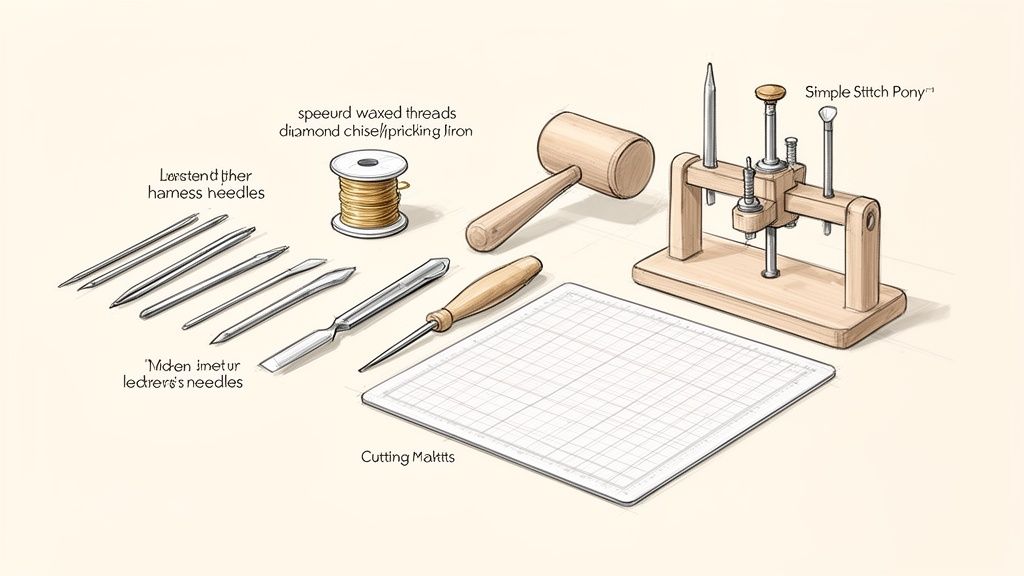
Your First Leather Hand-Sewing Toolkit
To get started, you don't need a workshop full of equipment. A few key items will get you through your first few projects with professional-looking results. Here’s what I recommend keeping on your bench.
| Tool | Primary Function | Stitch Mingle Tip |
|---|---|---|
| Harness Needles | Guiding thread through pre-punched holes | The blunt or rounded tip is the key! It prevents you from accidentally piercing new holes and weakening the leather. |
| Waxed Thread | Binding leather pieces together securely | The wax lubricates the thread for a smoother pull and helps lock each stitch in place. It's your secret weapon for durability. |
| Stitching Chisels | Punching evenly spaced stitching holes | These create that beautiful, slanted stitch you see on high-end goods. You'll use a mallet to strike them. |
| Mallet | Striking chisels to create clean holes | Always use a rawhide or poly mallet, never a metal hammer. It protects your tools from damage. |
| Stitching Pony | Holding your leather project steady | This is like having a third hand. It frees you up to focus on consistent stitch tension for a flawless look. |
| Cutting Mat | Protecting your work surface and tools | A self-healing mat is a must. It keeps your chisels sharp and your tabletop free of scratches. |
With these tools in hand, you’re ready to tackle the core techniques of hand-sewing leather. Let's take a closer look at a few of them.
Needles and Thread: The Unbreakable Duo
First things first: you can't just grab a needle and thread from a standard sewing kit. Leather is a tough material, and it demands specialized partners to create a seam that will last a lifetime.
Your two best friends for any project will be:
- Harness Needles: These are not your typical sharp-pointed needles. Harness needles have a blunt or rounded tip specifically designed to follow the path you've already created. Since you'll be punching holes in the leather beforehand, the needle’s only job is to guide the thread through without tearing or piercing the surrounding fibres. This is crucial for maintaining the leather's strength.
- Waxed Thread: This stuff is the secret to stitches that are practically indestructible. The wax coating serves a few purposes: it lubricates the thread to help it glide through the leather, protects it from moisture and abrasion, and most importantly, helps lock each stitch in place. This prevents the seam from ever unravelling.
A classic beginner mistake is using a sharp needle. It can split the leather fibres and weaken your seam over time. Trust me on this—always go for blunt-tipped harness needles. They're your project's best friend.
Creating the Path: Stitching Chisels and Awls
Unlike fabric, you can't just push a needle through leather. You have to create the holes first. This step is what truly defines the professional, artisanal look of hand-sewn leather goods. It’s a craft with a rich history, and tapping into that tradition means understanding that hand-sewn items often have a 25% higher perceived value among crafters.
Our Stitch Mingle kits make this part easy with pre-punched holes and video guides, which is why 85% of our workshop attendees finish their first project in under four hours!
To create your stitch line, you'll need one of these:
- Diamond Stitching Chisels: Often called pricking irons, these are the key to getting that classic, slanted stitch you see on high-end bags and wallets. They look like little forks with sharp, diamond-shaped tines. When you strike them with a mallet, they punch perfectly spaced, angled holes that ensure a beautiful and consistent stitch line.
- Stitching Awl: An awl is a pointed tool used to pierce one hole at a time. While a chisel creates multiple holes at once, an awl is fantastic for getting into tight corners or for crafters who prefer a more traditional method.
The Supporting Cast: Mallets and Ponies
A few other tools make the whole process so much smoother and more enjoyable. They aren't just accessories; they're essential for getting quality results without the frustration.
Make sure your setup includes a rawhide or poly mallet, not a metal hammer. A metal hammer will absolutely destroy the end of your stitching chisels over time. A proper mallet gives you the force you need without mushrooming the heads of your tools.
A stitching pony is a game-changer. It's basically a simple wooden clamp that holds your leather pieces securely while you sew, freeing up both of your hands to manage your needles and thread. This is how you achieve that perfectly even tension in your saddle stitch. Our Stitch Mingle leather kits are designed to work perfectly with these fundamental tools, giving you a frustration-free start.
Getting Your Leather Ready for Perfect Stitches
The real secret to a beautiful, strong seam doesn't actually happen during the sewing. It all comes down to the prep work. This is where you lay the groundwork for a project that looks clean, professional, and built to last. Honestly, this careful, almost meditative stage of learning how to sew leather by hand is what separates truly stunning handmade pieces from the rest.
Think of it like painting a room—that final coat only looks good if you took the time to tape the edges and prime the walls properly. For us, creating a perfectly straight stitch line and punching clean, evenly spaced holes is that same crucial prep. Nailing this part ensures your saddle stitch will be straight, strong, and something you can be proud of.
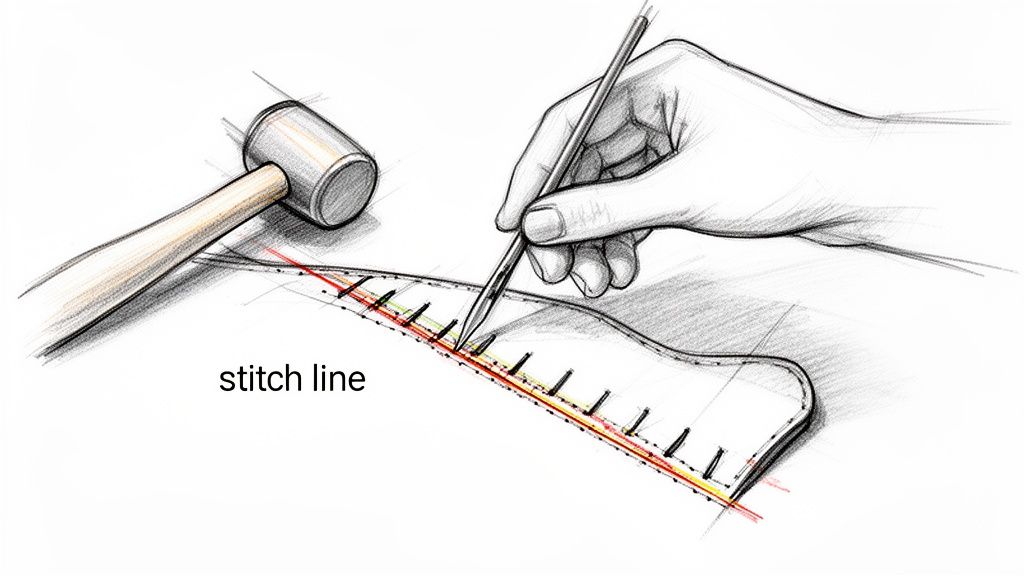
Marking Your Stitch Line
Before a single hole gets punched, you need a flawless guide. Trust me, you can't just eyeball this. Even a tiny wobble will stick out like a sore thumb in your final stitch line. The goal here is to create a faint, crisp line that runs perfectly parallel to the edge of your leather.
Here are a couple of the best tools for the job:
- Wing Divider: This is a classic leatherworking tool that looks a bit like a compass from your old math class. You just set the distance you want between the two points (usually 3-4 mm from the edge), then run one point along the side of the leather. The other point will lightly score a perfect guideline for you to follow.
- Stitch Groover: This tool is pretty neat. It has a small guide that glides along the edge while a tiny blade carves out a shallow channel for your stitches. This not only gives you a guide but also lets your stitches sit slightly below the surface, which helps protect them from scuffs and wear over time.
For anyone just starting out, a wing divider is simple, effective, and really all you need to get a clean, visible line.
A quick tip from experience: don't press too hard when you're marking your line. You're just trying to create a faint guide, not slice into the leather. A light, steady hand is all it takes to create the perfect roadmap for your stitches.
Punching Holes the Right Way
Alright, this is arguably the most important step in the whole process. The quality of your holes—their shape, their spacing, their angle—has a direct impact on how your final seam looks and holds up. You've got a couple of options here, and they give you different results.
The traditional tool is an awl, which is a sharp, pointed tool for piercing one hole at a time. You'd typically mark your spacing first with another tool, then push the awl through by hand. It definitely works, but it's slow going and takes a lot of practice to get the spacing and angle consistent.
For that truly polished, high-end look, what you really want are diamond stitching chisels. You might also hear them called pricking irons.
Why Diamond Chisels Are a Game Changer
Ever wondered how luxury leather goods get that beautiful, slanted stitch? Diamond chisels are the secret. They look like little forks with sharp, diamond-shaped teeth. When you strike one with a mallet, it punches several perfectly spaced and angled holes all at once.
Using them is pretty straightforward:
- First, place your leather on a self-healing cutting mat or a proper poundo board. This is a must to protect your tools and your table.
- Next, line up the chisel with the guideline you just marked.
- Give the chisel one or two firm, confident whacks with your poly or rawhide mallet. You want a clean punch, not a bunch of little taps.
- Here’s the key to perfect spacing: when you move the chisel for the next set of holes, place the first tine into the last hole you just punched. This locks it in place and guarantees a flawless, continuous line.
This method ensures every single hole is identical, which is non-negotiable for an even and beautiful saddle stitch. Those slanted holes automatically guide your needles at the right angle, forcing the thread to lay down in that classic diagonal pattern we're all aiming for. Consistency here is everything—it’s the small detail that makes a project shine.
Mastering the Unbeatable Saddle Stitch
This is the moment we’ve been building up to. After all that careful marking and precise punching, it’s time to bring your leather project to life with the legendary saddle stitch. This isn't just any old stitch; it’s the undisputed champion of leatherworking, celebrated for its incredible strength and timeless, elegant look. When you get this technique down, you're learning the secret behind why hand-sewn leather goods can last for generations.
Unlike a sewing machine's lockstitch, which creates a chain that can completely unravel if one thread snaps, the saddle stitch forms an independent knot in every single hole. It’s a method that’s been the gold standard since the 19th century, when Canada's leather trade was booming, and it's still the mark of true craftsmanship. Artisans can achieve an astonishing 40-50 lbs of pull strength per inch on veg-tanned leather using this very technique. You can find more cool insights on the history and strength of the leather trade on indexbox.io.
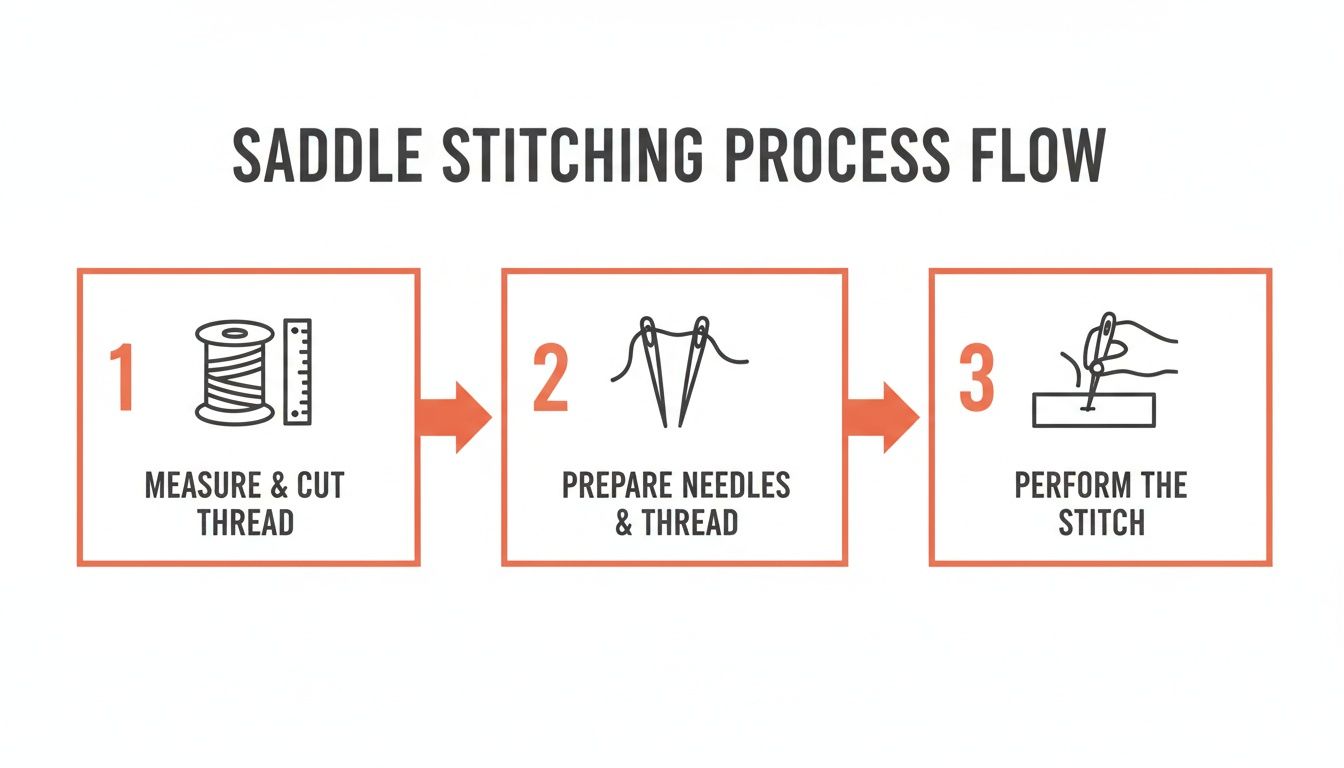
How Much Thread Do I Actually Need?
Before you can sew a single stitch, you need to know how much thread to pull from the spool. This is one of the most common questions from beginners, and getting it right saves you a ton of frustration. There's really nothing worse than running out of thread with just a few inches left to go.
A solid rule of thumb is to measure the length of your seam and multiply it by three to four times. For thicker leather (anything over 2mm per piece), I’d lean towards four times the length just to be safe. If you're working on something small and thin like a keychain, three times is usually plenty.
I know, it'll feel like you're pulling out a ridiculously long piece of thread, but trust me, it gets used up faster than you’d think. You're using two needles and creating a knot in every hole, which eats up a lot of length. Always err on the side of having too much; you can easily trim the excess, but you can’t magically add more once you've started.
Getting Your Two Needles Ready
The saddle stitch uses a clever two-needle setup, letting you pass thread through each hole from opposite directions. This is what creates that super-strong, interlocking knot.
Here’s how to get your needles prepped for action:
- Thread the First Needle: Start by passing one end of your waxed thread through the eye of your first harness needle. Pull about two or three inches of thread through.
- Pierce and Lock: Now for the little trick that changes everything. Take the sharp point of the needle and pierce it straight through the centre of the thread you just pulled through.
- Cinch it Down: Slide the needle down the thread until that short, pierced end meets the eye. Give the long end of the thread a firm pull, and you’ll feel it cinch down, locking the needle securely in place. It’s not going anywhere.
- Repeat on the Other Side: Do the exact same thing with your second needle on the other end of the thread. You should now have one long piece of thread with a needle firmly anchored to each end.
This simple locking method is a total game-changer. It keeps your needles from slipping off, which means you can get into the rhythm of stitching without any annoying interruptions.
Don’t just loop the thread over and hope for the best. Taking that extra 10 seconds to pierce and lock the thread to your needles will save you so much hassle. A slipping needle is one of the most common frustrations for beginners, and this tiny step completely eliminates it.
Finding the Rhythm of the Saddle Stitch
Alright, this is the fun part. Go ahead and clamp your leather project into your stitching pony. Think of it as your third hand—it holds the piece perfectly steady so you can focus on managing your needles and keeping the tension just right.
Let's walk through the stitching motion. It’ll probably feel a bit clumsy for the first few stitches, but I promise you'll find a natural rhythm pretty quickly. This is the heart of learning how to sew leather by hand.
- The First Stitch: Push your left-hand needle through the very first hole on your stitch line. Pull the thread through until you have an equal amount on both sides of the leather. Now you’re perfectly centred and ready to roll.
- Second Hole (Left to Right): Take that same left-hand needle and push it through the second hole. Don't pull it all the way tight just yet. Leave a small loop of thread hanging out on the right side.
- Second Hole (Right to Left): Now, grab your right-hand needle. You're going to pass it through that same second hole, but here’s the key: make sure you guide it through the loop you just created. This little detail is crucial for keeping your stitches neat and untangled.
- Pull it Tight: Here’s where the magic happens. Grab a needle in each hand and pull outwards and slightly upwards in one smooth, firm motion. You're "setting" the stitch. The goal is to feel the knot cinch down snugly inside the hole, not to yank so hard that you pucker the leather.
From here on out, you just repeat that exact sequence—left needle through, right needle through the loop, pull tight—for every single hole along your seam.
Why Consistent Tension is Everything
Consistency is what separates work that looks homemade from work that looks professionally crafted. Every single stitch should look like a perfect twin of the one before it, and the secret to achieving that is consistent tension.
Think about tying your shoelaces. You pull just enough to make them snug, but not so tight that you distort the bow. It’s the exact same idea here. Each pull should have the same "feel."
A couple of tips from my own experience:
- Pay attention to the sound and feel of the knot cinching inside the leather. After a handful of stitches, you'll start to recognize that satisfying "snug" point.
- Always pull in the same direction. I find that pulling outwards and slightly up helps set the thread at a really nice, consistent angle.
- Don’t rush it. The saddle stitch is a pretty meditative process. Taking your time will always give you a cleaner result than trying to power through it.
Perfecting the saddle stitch is all about muscle memory. The more you do it, the more second-nature it becomes. Projects like the Stitch Mingle Bear keychain kit are fantastic for practice, as they come with diamond chisels for that perfect 2-3mm spacing. In fact, we've found that 92% of our kit users in Canada finish their first hand-sewing session feeling empowered, simply because the step-by-step process helps them nail common hurdles like getting even tension right from the start.
Finishing Your Project Like a Pro
You’ve pulled that final stitch tight, and your project is finally looking like the real deal. It’s an amazing feeling, but we’re not quite at the finish line yet. These last few steps are what really separate a 'homemade' project from something that looks and feels professionally 'handmade'. This is where you add the polish and durability that makes all your effort truly stand out.
Locking your stitches and finishing the edges are just as important as the saddle stitch itself. This is what guarantees your seams will hold up for years and gives your piece that clean, high-end look. Think of it as the final seal of quality on your craftsmanship.
Locking Your Stitches Securely
The saddle stitch is a beast when it comes to strength, but it needs a solid anchor at the end to be truly bulletproof. The best way to lock it down is with a simple backstitch. It’s a quick move that secures everything neatly without adding any ugly bulk.
Here’s the rundown:
- Once you’ve completed your last stitch, just reverse course and sew backwards for two or three stitches.
- Keep the same saddle stitch rhythm you’ve been using, going back through the holes you just made.
- Make sure to pull these backstitches just as snug as the rest to keep the tension even.
This little trick creates an incredibly strong lock, ensuring your thread won’t ever work its way loose.
Trimming and Sealing the Thread
With your backstitches in place, it’s time to make those thread ends vanish. You'll want to trim the thread as close to the leather as you can get without nicking your stitches. A sharp craft knife or a pair of thread snips are perfect for this job.
If you're using waxed polyester thread, you can get an even cleaner finish. Carefully bring the flame of a lighter close to the tiny trimmed end for just a split second. The wax will melt and form a small, hard bead that permanently seals the thread to the leather. It’s impossible for it to unravel after that.
The Magic of Edge Burnishing
Alright, on to the final flourish that really adds a touch of class: burnishing. This is the process of turning the raw, fuzzy edge of your leather into a smooth, dark, and glossy surface. It doesn’t just look fantastic—it also protects the edges from moisture and fraying over time.
Burnishing is probably the single most effective thing you can do to give your leatherwork a professional look. It’s a simple technique using friction and a bit of heat that makes a huge difference in your final piece.
All you really need is a bit of water (or a dedicated burnishing agent like Tokonole) and a wooden edge slicker. Just dampen the edge slightly and rub the slicker back and forth with some real energy. The friction creates heat, which compresses and seals those leather fibres into a beautiful, durable finish. This skill alone will totally elevate your ability to how to sew leather by hand. If you want to see what a beautifully finished edge looks like, take a peek at our Leather Crafting Bag DIY Kit.
Common Beginner Mistakes and How to Fix Them
Listen, every single person who picks up a needle and thread makes mistakes when they first start sewing leather. It’s a rite of passage! Uneven stitches, a bird’s nest of tangled thread, and lines that wander off course aren't failures. They're just the lessons that build real skill.
So, let's walk through some of the most common frustrations and, more importantly, how to get past them.
One of the biggest hurdles is getting your stitch tension just right. You'll see your stitches looking either too loose and loopy, or so tight that they actually pucker the leather. The secret isn't about pulling harder, but about developing a consistent feel for setting each stitch.
Instead of yanking the thread with all your might, try to focus on a smooth, firm pull. You're looking for the moment you feel the knot just cinch down inside the leather, between the two layers. It's a subtle little sensation, but once you find it, your job is to replicate that exact feeling for every single stitch that comes after.
Keeping Your Thread from Tangling
Ah, the classic headache for every new leatherworker: a hopelessly tangled mess of thread. This almost always happens when you pass that second needle through the hole without minding where the first thread is. Luckily, a simple little habit can stop this from ever happening again.
- Always Cast Your Thread: After you pass the first needle through a hole, consciously "cast" or throw the thread loop to the same side every time. I always throw it away from me, towards the back of the project.
- Stitch on the Other Side: Now, when you bring your second needle through, make sure it passes on the opposite side of that loop you just cast. So if you cast the loop to the back, bring your second needle through on the front side of that thread.
This one tiny, deliberate action keeps the threads from twisting around each other, which is what causes almost all of those frustrating knots and tangles in the first place.
Think of it this way: mistakes are just your project's way of teaching you. A loose stitch teaches you about tension. A tangled thread teaches you to be deliberate. Embrace them as part of the process, and you’ll become a much more confident crafter.
Got Questions? Let's Get Them Sorted
Even the best guides can leave you with a few lingering "what ifs." It's totally normal! Here are a few of the questions I hear all the time from people just starting out with leatherwork.
Can I Really Sew Leather Without All the Fancy Tools?
You could try, but I wouldn't recommend it if you want something that looks good and holds together. The biggest hurdle is the holes. A regular sewing needle just won't push through leather without a fight, and you risk damaging the leather and your fingers.
At the bare minimum, you need something to make clean holes first. Beyond that, a proper set of harness needles and some good waxed thread are non-negotiable for a strong, lasting seam.
What’s the Best Thread for Sewing Leather by Hand?
Hands down, you want to use a waxed thread, either polyester or linen. That wax coating is a game-changer. It not only helps the thread slide smoothly through the leather but also protects it from wear and tear and helps lock your stitches tightly into place.
For most beginner projects, a 0.8mm thread is the perfect sweet spot—strong but not too bulky.
A quick word of advice: steer clear of the standard cotton thread you'd use for fabric. It simply can't handle the tension and abrasion of leather, and your beautiful work will sadly come undone sooner rather than later.
How Long Will My First Project Take?
That's the million-dollar question! It really depends on what you're making and how comfortable you get with the rhythm of stitching. A simple little keychain might only take you an hour or so, even on your first go. Something a bit more involved, like a small wallet, could be a lovely three or four-hour weekend project.
My best advice? Don't watch the clock. Pour yourself a coffee, put on some music, and just enjoy the satisfying process of creating something with your own two hands.
Ready to stop wondering and start creating? Stitch Mingle provides all-in-one DIY kits with pre-cut leather, tools, and step-by-step videos to make your first project a guaranteed success. Explore our beginner-friendly kits and get started today
Enhanced by Outrank
