
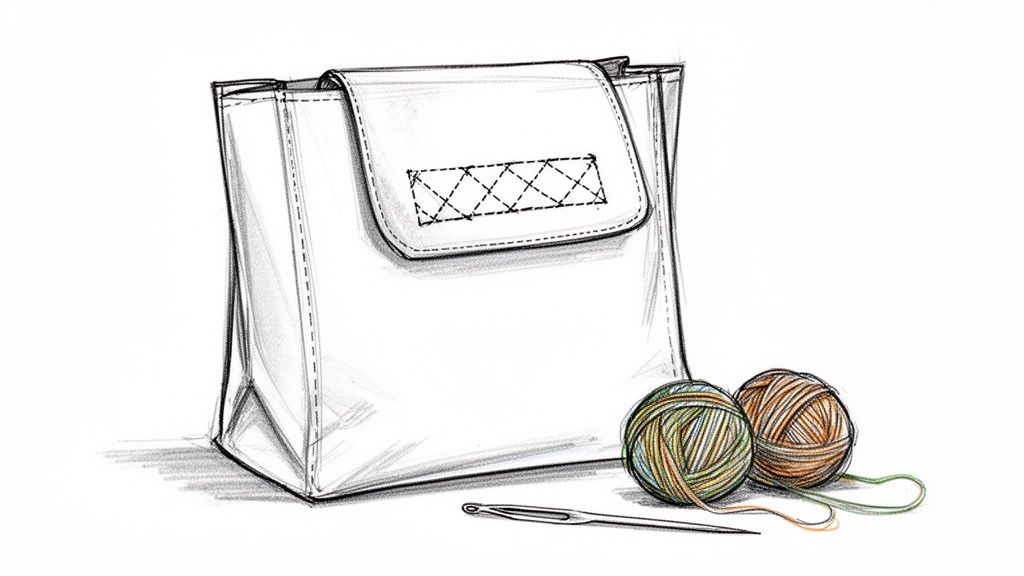
Welcome to the wonderfully creative and surprisingly relaxing world of plastic canvas crafting! If you've been searching for a fun DIY project that leaves you with a seriously chic and useful accessory, you’ve found it. Making your own plastic canvas bag is the perfect place to start.
This guide is designed to walk you through the whole process, step by step, using a fantastic beginner-friendly kit from Stitch Mingle. They've done the hard part by providing all the pre-cut materials and clear instructions, so you can just dive into the fun.
Your Journey into Plastic Canvas Crafting
This project is truly perfect for anyone new to crafting or just looking for a satisfying way to unwind without a screen. We’ll cover everything from the moment you open your kit to learning the essential stitches and adding those professional-looking final touches. Get ready to build some new skills and create a beautiful, durable bag you’ll be so proud to carry.
A Nod to Sustainable Crafting
Making your own accessories is more than just a hobby; it’s a small but meaningful move toward a more sustainable lifestyle. As more of us turn away from single-use items, crafting durable, reusable alternatives feels really good. This shift gained a lot of steam after states started getting serious about tackling plastic waste.
Before new legislation kicked in, Californians were going through an incredible 9-10 billion single-use plastic bags every year. That number is mind-boggling, right? It highlighted a huge environmental problem and led California to become the first U.S. state to enact a statewide ban. This created a perfect opening for sustainable DIY projects, like this very plastic canvas bag, to really take off. You can dive deeper into the data on California's pre-ban plastic bag consumption.
This project is about more than just making a bag; it's about being part of a bigger conversation. It's choosing quality and reusability over disposability, all while creating something that's 100% you.
What to Expect From This Guide
My goal here is to make this process as clear and enjoyable as I can. Forget about trying to decipher confusing patterns or running to the store for a missing piece of hardware. This tutorial is built around using a complete kit, which means you have everything you need from the get-go.
We’ll break down the entire project into easy, bite-sized pieces:
- Unboxing and Prep: First, we'll get you acquainted with all your materials and set up your crafting space for success.
- Mastering the Stitches: I’ll guide you through the basic stitches with clear photos, so you'll feel like a pro in no time.
- Assembly and Finishing: This is where it all comes together! You'll learn how to join your canvas pieces and attach the hardware for a polished look.
- Personalization Ideas: Let's get creative! I'll share some fun ways you can put your own unique spin on your finished bag.
Unboxing Your Creative Journey: What’s Inside the Kit
There’s nothing quite like that little thrill of opening up a brand-new craft kit and seeing all the colourful possibilities laid out before you. Let’s dive into your Stitch Mingle plastic canvas bag kit and get acquainted with all the goodies inside. Think of this as our pre-project huddle!
Getting to know each component now will make the whole crafting process feel less like following instructions and more like creating something you truly love. Every piece has a part to play in bringing your stylish new accessory to life.
Your Crafting Essentials
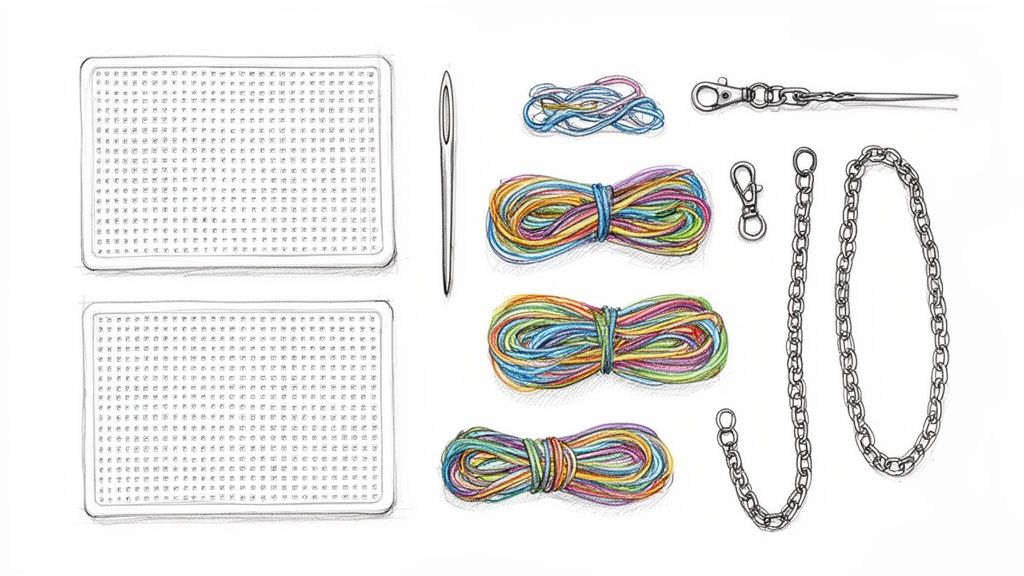
To make things super clear, I've put together a quick checklist of everything you'll find in the box. It’s always a good idea to lay everything out and check it off before you begin—it gets you in the zone and ensures you’re ready to roll.
Your Plastic Canvas Bag Kit Checklist
| Component | Description | Pro Tip |
|---|---|---|
| Plastic Canvas Sheets | These are the pre-cut rigid grids that form the structure of your bag. They're sturdy and ready to go! | Count your pieces to make sure they match the pattern guide before you start stitching. |
| Coloured Yarn | You’ll get all the yarn colours you need, perfectly coordinated for the design. | To avoid tangles, cut your yarn into 45 cm (18-inch) lengths as you work. |
| Tapestry Needle | A blunt-tipped needle with a large eye, designed to glide through the canvas without snagging the yarn. | If you have trouble threading, fold the yarn tip over the needle and pinch it tight to push it through the eye. |
| Hardware | The finishing touches! This includes the chain strap, D-rings, and magnetic clasp for a secure closure. | Keep these small pieces in a little dish or a section of the box so they don't get lost. |
Now that you've got the lay of the land, let's look a little closer at a few of the key players.
The pre-cut plastic canvas sheets are the real hero here. They're the foundation of your bag, giving it that structured, durable shape. Because they’re already cut to the perfect size, you can skip the tricky measuring and cutting and jump straight to the fun part: the stitching.
Of course, what’s a canvas without colour? The kit comes packed with all the yarn you'll need. We pick yarns that are not only vibrant but also have a smooth texture that makes stitching a breeze and gives you that lovely, full coverage on the canvas.
My Go-To Tip: Seriously, don't skip cutting your yarn into manageable 45 cm lengths. I learned the hard way that trying to stitch with a super long piece of yarn leads to a tangled, knotted mess. This one small step will save you a massive headache!
Finally, we have the hardware—the bag's "jewellery." These are the bits and pieces like the magnetic clasp, D-rings, and chain strap that take your project from a cool craft to a polished, professional-looking accessory you'll be proud to show off.
Having everything you need in one place is one of the best things about starting with a kit. If you're loving this idea, you can check out all the different styles in our full collection of plastic canvas bag craft kits.
Alright, now that you're an expert on your supplies, let's get ready to make some magic
Bringing Your Bag to Life, One Stitch at a Time
This is my favourite part—it's where flat, unassuming pieces of plastic start to become a real, three-dimensional accessory. With your yarn cut and your workspace ready, it's time to actually start stitching. We'll tackle this in two main stages: first, filling in the canvas panels with your main design, and second, joining them all together to build the bag's shape.
The real magic of making a canvas plastic bag is watching the design pop out as you fill the grid. Try not to rush this part; the rhythmic motion of stitching can be incredibly relaxing. This is where my earlier tip about cutting your yarn into manageable 45 cm lengths really comes in handy, saving you from a world of tangles.
Mastering the Foundational Tent Stitch
The workhorse of almost every plastic canvas project is the Tent Stitch. It’s just a simple diagonal stitch, but when you line them up in neat rows, they create a gorgeous, textured fabric that completely covers the plastic. I like to think of it as painting by numbers, but with yarn.
First thing's first: thread your tapestry needle. A key tip here is not to tie a knot at the end of your yarn. We're going to use a neater trick to secure it on the back of the canvas as we work.
- Make Your First Stitch: From the back of the canvas, push your needle up through a hole in the bottom-left corner of the area you want to fill. As you pull the yarn through, leave a little tail—about 2-3 cm long—on the back side.
- Lock it In: Now, take your needle down into the hole that's diagonally one space up and one space to the right. As you pull the yarn through to the back, make sure that stitch lies directly over top of the little yarn tail you left. That’s it! The tail is now trapped, no bulky knot required.
- Keep the Row Going: Bring your needle back up in the hole immediately to the right of where you started. Make another diagonal stitch, again going down one space up and one to the right. As you continue this pattern across the row, keep making sure your stitches on the back are catching and securing that initial tail.
This little technique is what keeps the inside of your bag looking clean and professional. Your other best friend here is consistent tension. You're aiming for stitches that lie flat and snug against the canvas, but not so tight that they bend or warp the plastic. It’s a gentle, even pull you’ll get the hang of pretty quickly.
A super common mistake I see beginners make is pulling their yarn way too tight, causing the plastic canvas to buckle. If you notice your panel starting to curve or pucker, just relax your grip a little. Your hands will find a natural, easy rhythm after the first dozen stitches or so.
Now, settle in and fill all your main panels—the front, back, and flap—following the colour guide from your kit. This is definitely the most time-consuming step, but it's also incredibly meditative. I love to put on a good podcast or some music and just get lost in watching the design come alive.
Joining Your Panels with the Whipstitch
Once all your individual pieces are filled with colourful Tent Stitches, it’s time for the big reveal: assembly! We'll use a clean, sturdy stitch called the whipstitch to join the edges of our canvas plastic bag. This stitch wraps neatly around the edges, creating a seam that's both durable and has a really polished look.
Think of it like binding a book—the whipstitch works in a similar way, holding everything together securely.
To start, grab the two pieces you want to join and line them up so the holes along the edges match perfectly. A good starting point is attaching one of the side panels (the gussets) to the main front panel of the bag.
Here's how you do the whipstitch:
- Bring your threaded needle up through the first set of aligned holes, moving from the inside of the bag to the outside.
- Just like we did with the Tent Stitch, leave a small tail on the inside and catch it with your first few stitches to anchor it.
- Now, loop the yarn over the top of the joined edges and bring the needle up through the very next set of holes, always from inside to out.
- Keep repeating this looping motion all the way down the seam. Each stitch should sit snugly next to the last, creating a neat, coiled effect that wraps around the edge.
After you've attached one side panel to the front, just repeat the process for the other side. Then, you’ll line up the back panel with the now-attached side panels and whipstitch those seams, too. Take your time, especially as you go around the corners, to make sure everything fits together snugly. This careful assembly is what gives your handmade bag its strength and shape, transforming it from a pile of parts into a finished piece you’ll be so proud to show off.
Adding Hardware for a Professional Finish
You're so close to the finish line! This is my favourite part of the whole process—it's where your handmade project sheds its crafty look and starts to feel like a real, polished accessory. Adding the hardware is what gives your canvas plastic bag that final, boutique-quality touch.
First things first, let's tidy up the inside. Before adding any of the shiny bits, flip your bag inside out. You’ll probably see a few stray yarn ends from where you started and finished your stitching. Just thread each one onto your tapestry needle and weave it under four or five stitches on the back of your work. This tucks them in securely without needing a clumsy knot. Once it's woven in, you can snip the tail right off, close to the canvas.
Taking a couple of minutes to do this now saves you from having those ends snag on your keys or lipstick later on. Trust me, it’s worth the effort for a clean finish.
Attaching the Clasp and D-Rings
Okay, time for the hardware! The clasp is what makes your bag functional, keeping all your essentials safely inside. Your kit might have a magnetic snap or a twist-lock, but the installation is pretty similar for both. The key is getting it perfectly centred on the front of the bag and the flap.
Most clasps come with little prongs on the back. You'll simply push these through the plastic canvas grid. On the inside, slide the metal washer over the prongs and then fold the prongs flat and outward to lock it all down.
My biggest piece of advice here: double-check the alignment before you bend those prongs. I always close the flap, figure out the exact spot where the clasp should sit, and mark it with a water-soluble fabric marker or even a tiny scrap of contrasting yarn. It's a lifesaver, because trying to undo and move a secured clasp is a real pain!
Next up are the D-rings. These little metal loops are what your chain strap will clip onto. You’ll want to attach them to the side panels, right near the top edge. Using a matching piece of yarn, just whipstitch over the flat part of the D-ring, going through the plastic canvas several times until it feels super sturdy. Give it a gentle tug to be sure.
This little flowchart captures the main crafting journey you've just been on, from getting your needle ready to actually stitching the panels together.
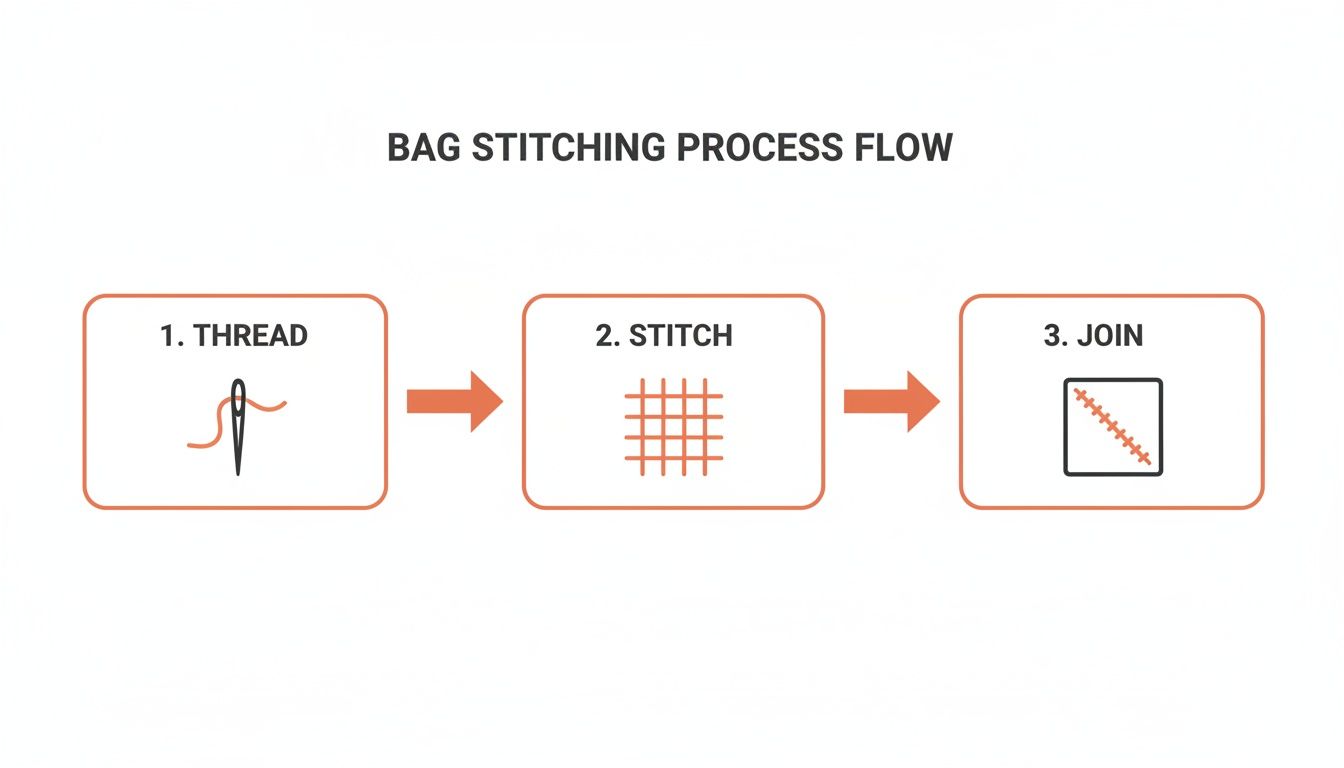
It’s a great reminder of how these simple actions build on each other to create something amazing, which is now ready for its final hardware.
Connecting the Chain Strap
And for the grand finale—clipping on that gorgeous chain strap! This is easily the most satisfying step. All you have to do is open the clasps on each end of the chain and hook them right onto the D-rings you just attached.
That’s it, you did it! You’ve officially made a beautiful, durable, and totally unique bag. Step back and take it all in.
Feeling inspired for your next project? You can always switch things up with different hardware. I love browsing for unique options, like this classic metal turn-lock clasp, to give each bag its own personality. Go on, admire your handiwork—you’ve earned it
Making Your Canvas Bag Uniquely Yours
Your Stitch Mingle kit gives you everything you need to create a gorgeous bag, but the real magic happens when you add your own personal flair. This is your chance to take a fun craft project and turn it into an accessory that’s 100% you.
Think of the finished bag as your new blank slate. The kit's design is a beautiful starting point, but the creative journey doesn't have to end with the last stitch.
Add a Splash of Colour and Personality
One of the simplest and most effective ways to customize your bag is by playing with the yarn colours. Even if you stick to the kit’s pattern, just swapping one colour for another can completely transform the look and feel. Why not try an ombré effect on the flap, stitch a bold monogram onto the front panel, or even go for a funky, multi-coloured checkerboard pattern?
Once your bag is all stitched up, you can have even more fun by adding a few accessories. It's amazing how these small details can make a huge impact.
- Embroidered Patches: Show off your style with patches that reflect your hobbies or a cool design you love. Our collection of embroidered patches and custom name tags can be easily stitched right onto the canvas for that custom-made feel.
- Cute Keychains: Clip a playful keychain to one of the D-rings or onto the chain strap itself. Our adorable Puppy or Bear keychain kits are a perfect match and add a touch of whimsy.
- DIY Tassels or Pompoms: Got some leftover yarn? Craft a simple yarn tassel or a fluffy pompom. It’s a super quick, no-cost way to add a pop of colour and texture.
Here's a little trick I often use: I create a small interior pocket. I just take a spare piece of canvas, stitch it up with a fun yarn colour, and then whipstitch it to the inside lining. It’s the perfect size for stashing cards or a lip balm.
This kind of personalization is about more than just decoration; it's a statement. By crafting your own reusable accessories, you’re actively pushing back against throwaway culture. The need for real, durable alternatives is more important than ever. After California's initial plastic bag ban, a surprising study revealed that plastic bag waste actually went up by nearly 47% between 2014 and 2021. This happened because the law allowed for thicker plastic bags to be sold, an unintended side effect that really underscores the value of truly reusable options. You can read more about California's ongoing efforts with plastic waste.
Thinking Outside the Box
Don't be afraid to experiment with the bag's structure, either. You could create a striped pattern on the side panels or use a contrasting colour for the whipstitch seams to make them pop. Every little decision you make helps tell your unique story through your craft.
In the end, personalizing your canvas plastic bag is all about making it a true extension of yourself. Whether you're crafting it as a thoughtful gift or as a special treat for yourself, these little tweaks will ensure your creation is as one-of-a-kind as the person carrying it.
Common Questions About Plastic Canvas Bags
As you get into the groove of your project, a few questions are bound to pop up. It happens to the best of us! To help you out, I’ve pulled together some of the most common queries I hear from fellow crafters. Consider this your go-to guide for getting the best possible results on your plastic canvas bag.
Don't sweat it if things aren't looking perfect right away. Crafting is all about the journey, and every single stitch is a chance to learn. Let's tackle some of those little issues so you can get back to creating with confidence.
My Stitches Look Uneven—What Am I Doing Wrong?
Uneven stitches are easily the number one worry for beginners, so you're definitely not alone! The secret here is all about consistent tension. It's so easy to pull your yarn extra tight, thinking it will make things neater, but that can actually bend and warp the canvas. On the other hand, stitches that are too loose can look a bit puffy and untidy.
Try to find that happy medium—a gentle, even pull with each stitch you make. It also helps to double-check that you're always bringing your needle up and down through the holes in the same direction for every stitch in a given row. A little practice is all it takes to find your rhythm, and before you know it, your stitches will look beautifully uniform.
Here's something to feel good about: choosing to make a durable, reusable bag is a real step toward sustainability. Efforts like California's plastic bag ban had some surprising results. While the ban cut carryout bag use by a whopping 40 million pounds per year, it was partly offset by a 12 million pound increase in trash bag sales. This meant about 30% of the plastic just came back in a different form, which really shows why truly reusable options matter so much. You can read more about these consumer behaviour findings.
How Do I Care for My Finished Bag?
Good news! Looking after your finished bag is super simple. The plastic canvas is tough and built to last, so for any light dust or little smudges, a quick wipe with a damp cloth is all you need.
If it ever needs a deeper clean, you can easily hand wash it. Here’s how:
- Fill a sink or basin with cool water and a tiny bit of mild soap.
- Pop the bag in and gently squeeze the suds through the yarn.
- Rinse it well with cool, clean water until all the soap is gone.
- Important: Whatever you do, don't wring or twist the bag! That’s a surefire way to distort its shape.
To dry it, just gently press it back into shape and lay it flat on a clean towel, somewhere away from direct heat or sun. With just a little care, your handmade bag will stay looking fantastic for years.
Can I Use Different Yarn?
Of course! Switching up the yarn is one of the most fun and creative ways to personalize your plastic canvas bag. The yarn that comes in our kits is a standard worsted-weight (size 4) acrylic or wool, which is the perfect thickness for 7-mesh plastic canvas.
If you decide to use your own yarn, just look for something with a similar weight. This ensures you'll get nice, full coverage over the canvas without the yarn being too thick to pull through the holes easily. Experimenting with different colours, textures, or even fun specialty yarns like metallic or variegated threads can give your bag a completely custom look that’s all you.
Ready for your next creative adventure? Stitch Mingle offers a huge variety of beginner-friendly kits and unique accessories to get you inspired. Explore our kits and supplies
Prepared with the Outrank app
