
Thinking about picking up a new hobby? The best counted cross stitch kits for beginners are the perfect place to start. They bundle everything you need—fabric, pre-sorted thread, a needle, and a simple pattern—all in one neat package. This takes the guesswork out of getting started, letting you jump right into the fun part: creating something beautiful with thread.
Welcome to the Relaxing World of Cross Stitch
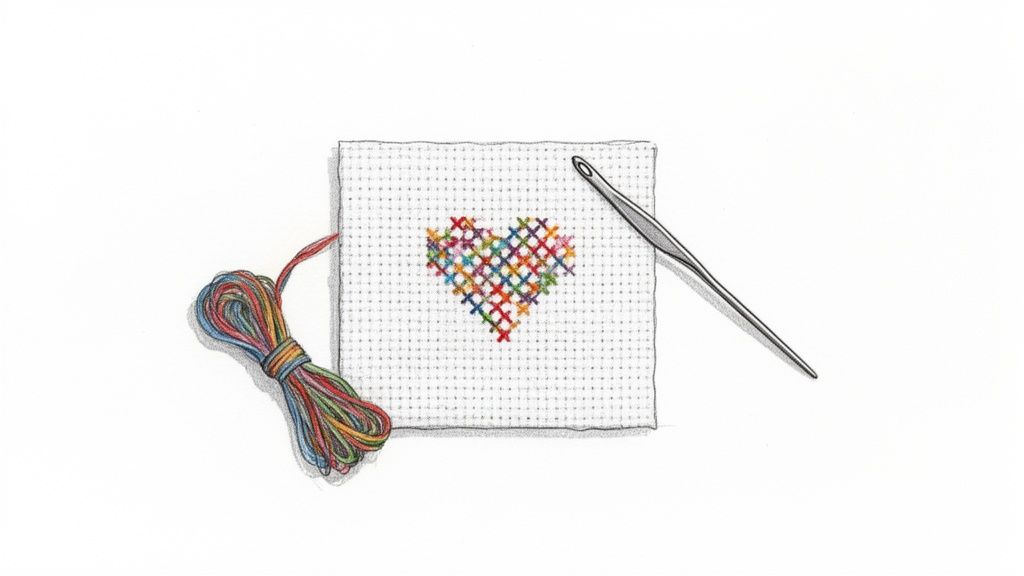
Ready to turn a simple piece of fabric into your very own work of art? Counted cross stitch is a wonderfully rewarding and calming hobby that's surprisingly easy to get the hang of. If you can make an 'X' with a needle and thread, you've already mastered the fundamental skill!
Think of it as painting by numbers, but you’re using colourful thread instead of paint. You just follow a simple chart that tells you exactly where to place each stitch on a special gridded fabric called Aida. The methodical process makes it an incredibly mindful activity, perfect for unwinding after a long day.
Why Start with a Kit?
Starting with a kit is the secret to a smooth and enjoyable first go. Instead of getting bogged down trying to figure out which supplies to buy, a beginner’s kit gives you a curated package where everything is perfectly coordinated. It's designed to set you up for success right from the very first stitch.
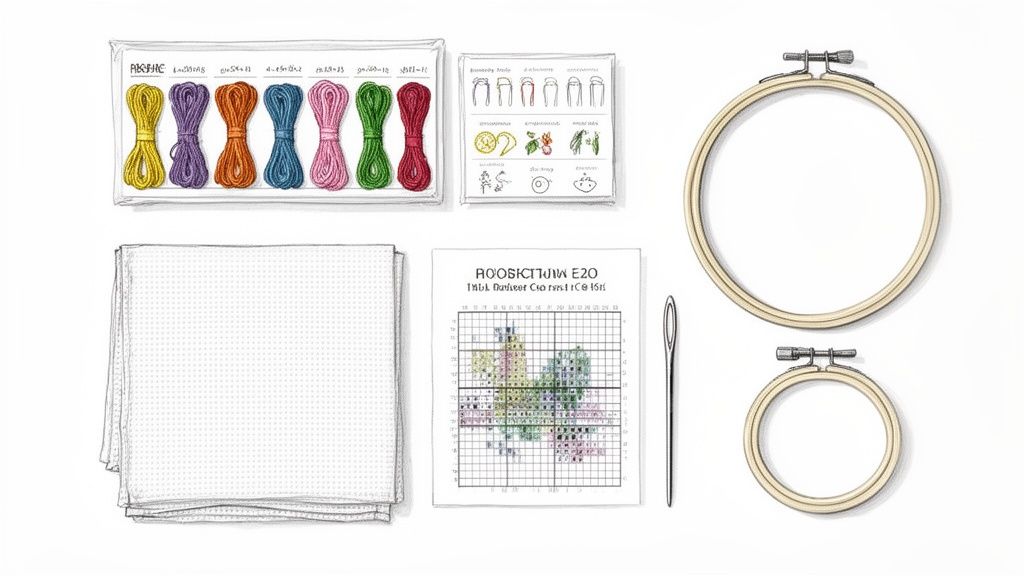
A good kit for someone just starting out will usually have:
- Aida Fabric: Typically 14-count, which has a nice, visible grid that’s easy on the eyes.
- Embroidery Floss: All the colours you'll need for the design, often pre-sorted and labelled for you.
- Tapestry Needle: A blunt-tipped needle that’s made to glide smoothly through the fabric holes without splitting them.
- A Simple Pattern: A clear, easy-to-read chart with a fun, manageable design.
This craft has seen a huge surge in popularity, especially with newcomers. For instance, California-themed beginner kits with a stitch count of around 50 x 60 on 14-count Aida have become incredibly popular, with sales jumping by 25% year-over-year. These projects are brilliant because they can often be finished in under 10 hours, giving you that quick and satisfying feeling of accomplishment.
Counted cross stitch is more than just a craft; it's an opportunity to slow down, focus your mind, and create something beautiful with your own hands. The process itself is just as rewarding as the finished piece.
With counted cross stitch kits for beginners, you’re not just buying supplies; you’re unlocking a stress-free path to creativity. And if you find you love this, you might be interested in exploring other guided projects. Feel free to check out our guide on sewing kits for beginners to find your next creative adventure
How to Choose Your First Cross Stitch Kit
Diving into the craft world can feel a little overwhelming at first. So many choices! But picking out your first counted cross stitch kit should be exciting, not stressful.
The best way to think of a beginner kit is like one of those meal-kit delivery boxes. Everything you need is already measured out and included, taking all the guesswork out of the equation. This lets you skip the head-scratching over what fabric to buy or which needle is best and jump right into the fun part: stitching!
What Makes a Kit Beginner-Friendly?
Not all kits are designed with newcomers in mind, and that’s okay. When you're just starting, you'll want to find one that sets you up for a quick and satisfying win.
The best counted cross stitch kits for beginners have a few things in common:
- A Simple, Cute Design: Pick something that makes you smile but doesn't look too complicated. Think small florals, a quirky animal, or a simple quote. These are manageable and super rewarding to finish.
- A Low Colour Count: A design that uses fewer than 10-15 colours is a great place to start. It means you won’t be constantly stopping to switch your thread, which makes the whole process feel much smoother.
- No Fancy Stitches (Yet!): Your first project should be all about mastering that basic 'X' stitch. It's best to avoid kits that call for a lot of extras like French knots or fractional stitches until you're feeling a bit more confident.
Your first project is all about building momentum and falling in love with the process. Choosing a kit with a simple, charming design you can finish relatively quickly is the best way to get that wonderful feeling of accomplishment that will keep you coming back for more.
Checklist for a Perfect Beginner Cross Stitch Kit
When you’re looking at different kits, there are a few key components that signal you’ve found a good one. Having the right tools and materials from the get-go makes a world of difference, turning potential frustrations into easy learning moments.
This checklist will help you know exactly what to look for. Paying attention to these details is what makes the difference between a relaxing, fun afternoon and a tangled, confusing one! If you're curious about embroidery in general, our guide to embroidery kits for beginners has some great extra tips that are helpful here, too.
Checklist for a Perfect Beginner Cross Stitch Kit
| Component | What to Look For | Why It Matters for Beginners |
|---|---|---|
| Fabric | 14-count Aida cloth | This fabric has a clear, visible grid with larger holes, making it the perfect canvas for learning. It's so much easier on the eyes and makes counting your stitches a breeze. |
| Floss | Pre-sorted DMC thread | Kits that come with the floss already sorted and labelled save you a ton of time and confusion. DMC is a fantastic, high-quality brand that doesn't tangle or fray easily. |
| Needle | Blunt tapestry needle | A blunt tip is your best friend! It glides easily through the holes in the Aida fabric without accidentally splitting the threads, which helps you make neat, even stitches. |
| Pattern | Clear, large-print chart | The pattern, or chart, should be easy to read with symbols that are easy to tell apart. A large, clearly printed chart helps prevent eye strain and mistakes. |
A kit that ticks all these boxes is thoughtfully designed to guide you through your first project with ease. It's all about making your introduction to cross stitch as enjoyable as possible
Reading Your Pattern and Prepping Your Fabric
Alright, you've got the perfect kit sitting in front of you. Let's tackle the two steps that can feel a little intimidating at first but are actually super simple once you get the hang of them. We're going to decode your pattern—your treasure map for stitching—and get your fabric all prepped and ready for its first stitch.
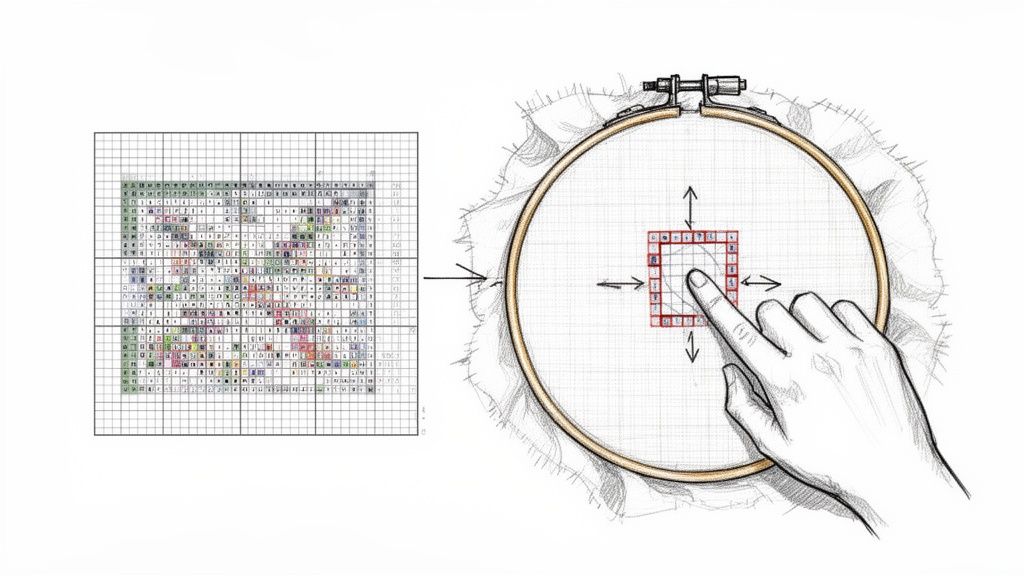
Think of your cross stitch pattern (often called a chart) as a direct, one-to-one map of the Aida fabric. Every single symbol you see on that piece of paper represents one square on your fabric. It’s a road map telling you exactly which colour of thread goes where.
It’s a clever little system that takes all the guesswork out of the equation. Your kit will have a key or legend that links each symbol to a specific thread colour, usually with a number attached. This way, you always know you're grabbing the right shade for the right spot.
Decoding Your Cross Stitch Chart
Getting cozy with your chart is the first real step toward stitching with confidence. It might look like a secret code, but it’s an incredibly clear guide once you learn to speak its language.
Here's the breakdown:
- The Grid: Your pattern is printed on a grid, usually broken up into 10x10 squares. This little detail is a huge help because it makes counting big sections of colour a total breeze.
- The Symbols: Inside each square on the chart, you'll find a symbol—maybe a star, a tiny circle, or a letter.
- The Colour Key: Find the legend on your chart. It's your Rosetta Stone! It will show a symbol next to a thread colour name and number (for example, Symbol: ★, Colour: DMC 310, Black).
So, every time you spot a star symbol on the grid, you know you need to make one cross stitch in that corresponding fabric square using the black DMC 310 thread. It’s truly that straightforward! Many charts also have little arrows at the top and side to mark the exact centre of the design, which is the perfect place to start.
Prepping Your Fabric for Stitching
Getting your fabric ready is like a chef setting up their mise en place before cooking. A few minutes of prep work sets you up for a smooth, enjoyable process, helping to prevent wrinkles and keep your stitches nice and even.
First things first, find the centre of your fabric. The easiest way is to gently fold it in half lengthwise, then fold it in half again widthwise. The point where the two folds meet is your centre. You can mark this spot with a pin or even a tiny, light pencil dot. This is your starting point, and it lines up perfectly with those centre arrows on your chart.
Next, you'll want to secure the fabric in an embroidery hoop. While not always included in counted cross stitch kits for beginners, a hoop is a stitcher's best friend. It holds the fabric taut, which is the secret to creating beautifully uniform stitches and stopping the material from puckering up as you work.
A taut fabric is a happy fabric! Using an embroidery hoop makes the fabric feel like a little drum, giving you a firm, flat surface to work on. This simple step is one of the best things you can do to make sure your stitches look neat and professional right from the start.
Getting to Grips with the Basic Cross Stitch
Everything in cross stitch comes down to one simple, elegant move: a tiny 'X' made with thread. That's really all there is to it! Think of this as your practical guide to getting that stitch just right, transforming you from someone who's just curious into a stitcher who feels totally in control. First things first, let's get your thread ready to go.
Most of the embroidery floss you'll find, including what’s in our counted cross stitch kits for beginners, is actually made of six smaller strands twisted together. For the 14-count Aida fabric that's standard for beginners, you'll almost always use just two of these strands. If you tried to use all six, you'd end up with bulky, crowded stitches that are a real pain to pull through the fabric.
Separating your floss is a breeze once you know the little trick. Cut a piece of thread about the length of your forearm—from your fingertips to your elbow is a good measure. Pinch one end, and with your other hand, gently pull a single strand straight up and out. The rest of the floss might bunch up into a little knot, but don't worry! Just let it happen. It'll straighten itself out as soon as the strand is free. Do this one more time to get your second strand.
Threading the Needle and Making That First 'X'
Alright, you've got your two strands. Time to thread your needle. Here’s a little hack that works like a charm every time: fold the very tip of the thread over the needle and pinch it super tight between your thumb and forefinger. Now, slide the needle out. You'll be left with a tiny, stiff loop of thread that’s incredibly easy to push right through the eye of the needle.
Now for the main event! With your needle threaded, you’re ready to make that first iconic 'X'. There are two main ways to do this, and honestly, neither one is better than the other. It's all about finding a rhythm that feels good to you and helps you create stitches that look nice and even.
- The English Method (One at a Time): This is where you complete each 'X' fully before moving on to the next one. You come up from the back at one corner, go down diagonally to make the first half (/), then come back up at the third corner and go down at the fourth to finish the 'X'. This method is fantastic for single, scattered stitches, which some people call "confetti stitches."
- The Danish Method (Row by Row): This is the go-to for stitching bigger blocks of the same colour. You'll work a whole row of the bottom half-stitches first (looking like this: /////). Then, you work your way back across the row, crossing each stitch with the top half to complete all the 'X's (like this: \\).
The Golden Rule: Keep Your Stitches Consistent
The secret to a project that looks polished and professional? Consistency. No matter which method you fall in love with, the single most important rule is to always make your top stitches lie in the same direction. So, if the top leg of your first 'X' goes from the top-right to the bottom-left (), every single 'X' that follows should do the exact same thing.
This simple habit is what gives a finished piece that beautifully smooth, woven texture. It helps the light reflect off the threads evenly, making the whole thing look cohesive and intentional.
By focusing on this one little detail, you're ensuring your final piece looks clean and tidy, no matter how simple or complex the pattern is. And just like that, you know the core mechanics. You're officially ready to put needle to fabric.
A Step-by-Step Guide to Your First Stitches
Alright, this is it! Time to put needle to fabric and start creating. Let's walk through those first few stitches together. It’s way easier than you think, and we'll start with the best way to secure your thread without a lumpy knot.
You've got your two strands of floss threaded through your needle, right? Perfect. Start by poking the needle up from the back of the fabric to the front. Don't pull the thread all the way through! Leave a little tail, maybe an inch or so, on the back.
Just hold that tail flat against the fabric with your thumb. As you make your first few stitches, you're going to stitch right over that tail on the underside. After about three or four stitches have anchored it, it's locked in place. You can snip off any leftover bit of tail, and voilà—a nice, flat start.
Completing Your First Block of Colour
Okay, let's look at your pattern. Find a little block of a single colour somewhere near the middle. This is where the Danish method we talked about earlier really shines. You’ll work a whole row of half stitches first, all leaning the same way (like this: ////).
When you get to the end of that little row, just work your way back in the other direction, crossing each stitch to make your 'X's (like this: \\). Seeing that first complete line of colourful Xs pop up is such a thrill. It's the first real sign of your masterpiece emerging from the fabric!
What if I mess up? Don't sweat it! A stitch in the wrong place is no big deal. Just use the blunt end of your needle to gently unpick it and have another go. Cross stitch is wonderfully forgiving.
Finishing Your Thread Neatly
Eventually, you'll either finish a section of colour or notice your thread is getting a bit short. Time to secure it. Flip your work over to the back.
Carefully slide your needle under the last three or four stitches you just made. Pull the thread through so it's snug, but not so tight that it puckers the fabric.
Now just snip the thread close to the fabric, and you're all set! This little trick keeps the back of your work looking tidy and ensures nothing unravels down the line. It's a clean, simple way to finish off.
This whole process—from threading your needle to finishing a stitch—is actually pretty simple when you break it down.
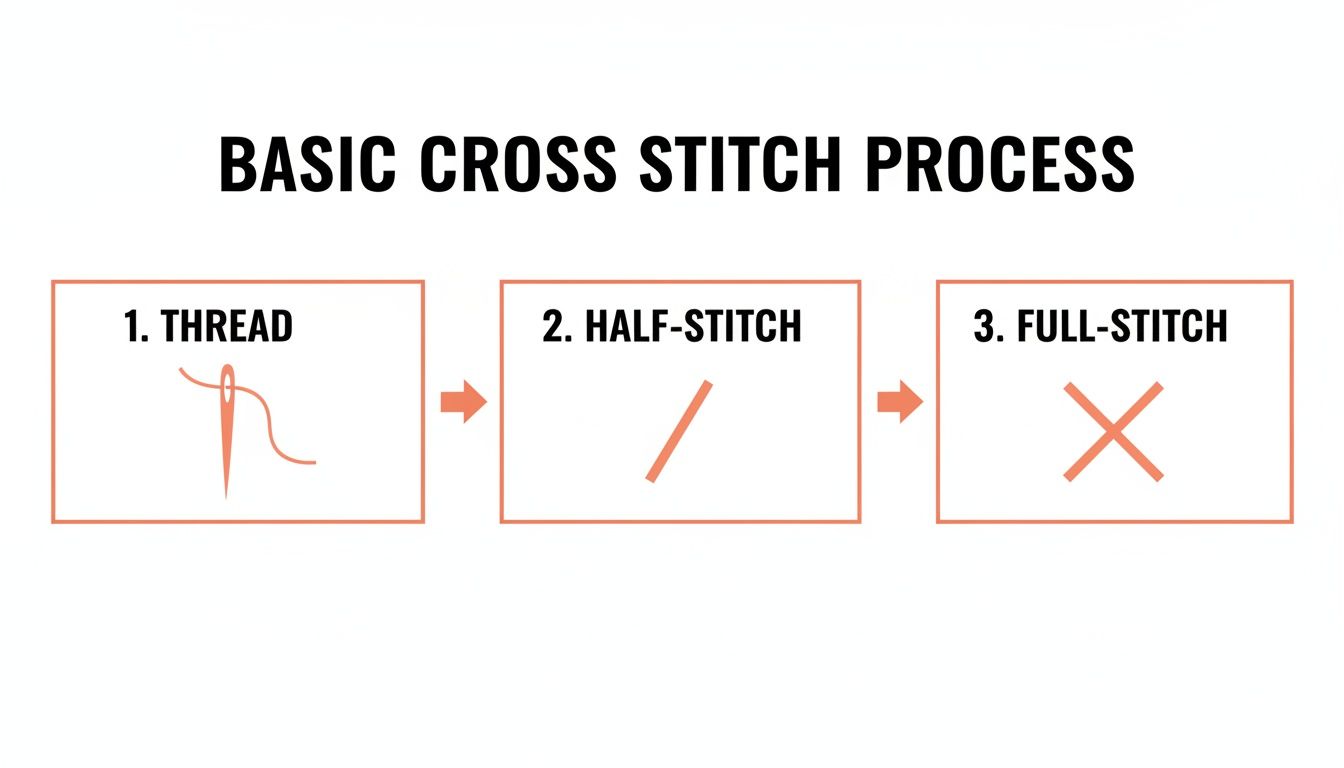
This visual guide shows the core movement in just three easy steps, making that fundamental stitch a piece of cake to learn. It's the same basic technique used in historical pioneer samplers, but modern kits make it so much more approachable.
In fact, a whopping 76% of beginners start with smaller patterns (under 60x60 stitches on 14-16 count fabric) to get a quick and satisfying win. If you're curious about the history or want to see more modern patterns, you can find tons of inspiration on sites like 123stitch.com.
Finishing and Displaying Your New Artwork
You did it! That final stitch is in, and you’re holding a finished piece. High five! Now comes the really fun part: turning your stitching into a piece of art you can actually show off.
First things first, let's give it a quick bath. This little step works wonders, washing away any oils from your hands and magically relaxing any creases or stubborn hoop marks.
Just fill a bowl with some lukewarm water and add a tiny drop of gentle soap. Swish your project around, give it a gentle rinse, and then lay it flat on a clean towel. Roll up the towel like a burrito to squeeze out the excess water, then leave it to air dry.
Creative Ways to Show Off Your Work
Once your piece is completely dry, it's time for a final press. The trick here is to place it face-down on a fresh, fluffy towel and iron the back of the fabric on a low setting. This protects all your beautiful stitches from getting squashed and gives the Aida a perfectly crisp, professional finish.
And now, it’s ready for its grand debut! Here are a few easy and popular ideas:
- Frame It in the Hoop: This is easily the simplest and most popular way to display your work. Just pop it back in the hoop you stitched it in, make sure it's centred and taut, trim the extra fabric around the back, and you've got instant wall art.
- Go for a Classic Photo Frame: For a more polished, traditional look, you can't go wrong with a standard picture frame. It elevates your piece and makes it feel right at home on a gallery wall or as a thoughtful gift.
- Make It a Patch: Got a smaller design you love? Trim the fabric, tuck the raw edges under, and stitch it onto a denim jacket, a tote bag, or a backpack for a custom flair.
The finishing touches are what really make your project shine. Taking that little bit of extra time to wash, press, and frame your work is what transforms it from a craft into a cherished keepsake you’ll be proud to have on display.
These finishing skills can be handy for other crafts too. As you get more adventurous with different materials, you might find yourself drawn to projects like this plastic canvas bag craft kit, where the final assembly is a huge part of the fun.
Got Questions? We’ve Got Answers!
As you start your first counted cross stitch project, you're bound to have a few questions bubble up. That’s a fantastic sign—it means you're really getting into it! Let’s tackle some of the most common queries that pop up for new stitchers.
Counted vs. Stamped: What's the Big Deal?
You've probably seen both "counted" and "stamped" cross stitch kits out there. So, what’s the difference, and why does it matter?
-
Counted Cross Stitch: This is the style you'll find in most modern kits, including ours. You work with a blank piece of gridded Aida fabric and follow a separate paper pattern. It's all about counting the squares on the chart and then making your stitches in the matching squares on the fabric.
-
Stamped Cross Stitch: With these kits, the pattern is printed right onto the fabric in colour. Your job is to simply stitch over the pre-printed marks.
While stamped kits can seem like a shortcut, most stitchers (including us!) recommend counted cross stitch kits for beginners. Why? Because you get a much cleaner, more professional-looking result. There's zero risk of any printed ink peeking through your stitches. It also opens the door to creating much more detailed and beautiful designs down the road.
The Mystery of the "Neat Back"
Sooner or later, you'll hear someone mention having a "neat back" on their project. While the front is obviously the main event, keeping the back reasonably tidy helps your finished piece lie flat and prevents any weird lumps or shadows from showing through.
Don't aim for perfection here! A neat back is less about being flawless and more about avoiding big knots and long, messy threads that could get tangled. The trick is to secure your thread ends by tucking them under a few nearby stitches on the back instead of tying knots. It’s a simple habit that makes a world of difference.
Help! I Ran Out of Thread!
It’s the moment every stitcher dreads: you're cruising along and realise you're almost out of a certain colour. It can feel like a mini-disaster, but it's usually a very simple fix!
First, do a quick check to make sure you've been using the right number of strands—most patterns call for just two strands of the six-stranded floss. Using too many is the number one reason for running short.
If you’re still out of thread, don't worry. Reputable kits almost always use a standard brand like DMC, where every single colour has a unique number code. Just find that number on your pattern key, pop over to a local craft shop or look online, and you can grab an identical skein to finish your project perfectly.
Ready to dive in without any of the guesswork? The Stitch Mingle counted cross stitch kits for beginners are designed to give you a flawless first experience. They come with absolutely everything you need, from top-quality materials to crystal-clear instructions, so you can start stitching with total confidence.
