
Summary: This guide provides a detailed analysis of craft kits for teens, focusing on the benefits of tactile hobbies as an alternative to screen time. We'll cover the best types of kits available, including leathercraft, plastic canvas, and embroidery, using specific metrics and a comparison table to help you select the right project. The guide also includes a detailed "how-to" section for a beginner leather project and tips for hosting a successful craft party, ensuring a positive and educational experience.
Why Craft Kits Are a Superior Screen-Free Hobby
In a digital-first world, finding engaging, non-screen activities for teenagers is a significant challenge. Modern craft kits provide a structured, hands-on outlet that is both entertaining and developmentally beneficial. Unlike the ephemeral rewards of digital entertainment, completing a tangible project offers a lasting sense of accomplishment.
A key benefit is the development of real-world skills. While progressing in a video game offers temporary satisfaction, the process of designing, stitching, and finishing a usable leather accessory builds practical abilities and a unique sense of pride.
Analyzing Modern Creative Trends with Specific Metrics
Today's craft kits for teens are designed to align with current youth culture, focusing on customization and personal expression. Projects often result in usable items like personalized accessories, custom embroidered patches for apparel, or unique keychains.
This trend is supported by market data. In California, demand for DIY craft kits among the 13-17 age demographic has increased by 28%, driven by parental efforts to reduce screen time. With teens averaging 7.5 hours per day on digital devices, the search for engaging alternatives is a priority for many families.
Expert Insight: Crafting provides a dedicated, focused environment for a teen to de-stress and channel their energy productively. The sequential nature of following instructions to complete a project is an effective method for building patience and boosting self-confidence.
A well-chosen kit can initiate a long-term hobby, teach a valuable skill, and offer a necessary respite from digital saturation. Matching the project to a teen's interests is crucial for transforming a simple activity into a tool for self-expression.
You might be interested in: our guide on easy crafts to do at home for more creative ideas.
What Are the Best Craft Kits for Teens? A Technical Comparison
Selecting a craft kit that resonates with a teenager requires matching the project's complexity and outcome with their interests. The goal is to find a kit that is not only enjoyable to assemble but also results in a product they are proud to use or display.
Teen participation in crafting has reached notable levels. In California, 62% of teens (approximately 1.55 million individuals) engage in crafting activities. Furthermore, consumer preference is shifting towards sustainable options, with 89% of families actively seeking non-toxic and eco-friendly materials.
If you're unsure which craft to pursue, a decision-making framework can be helpful.
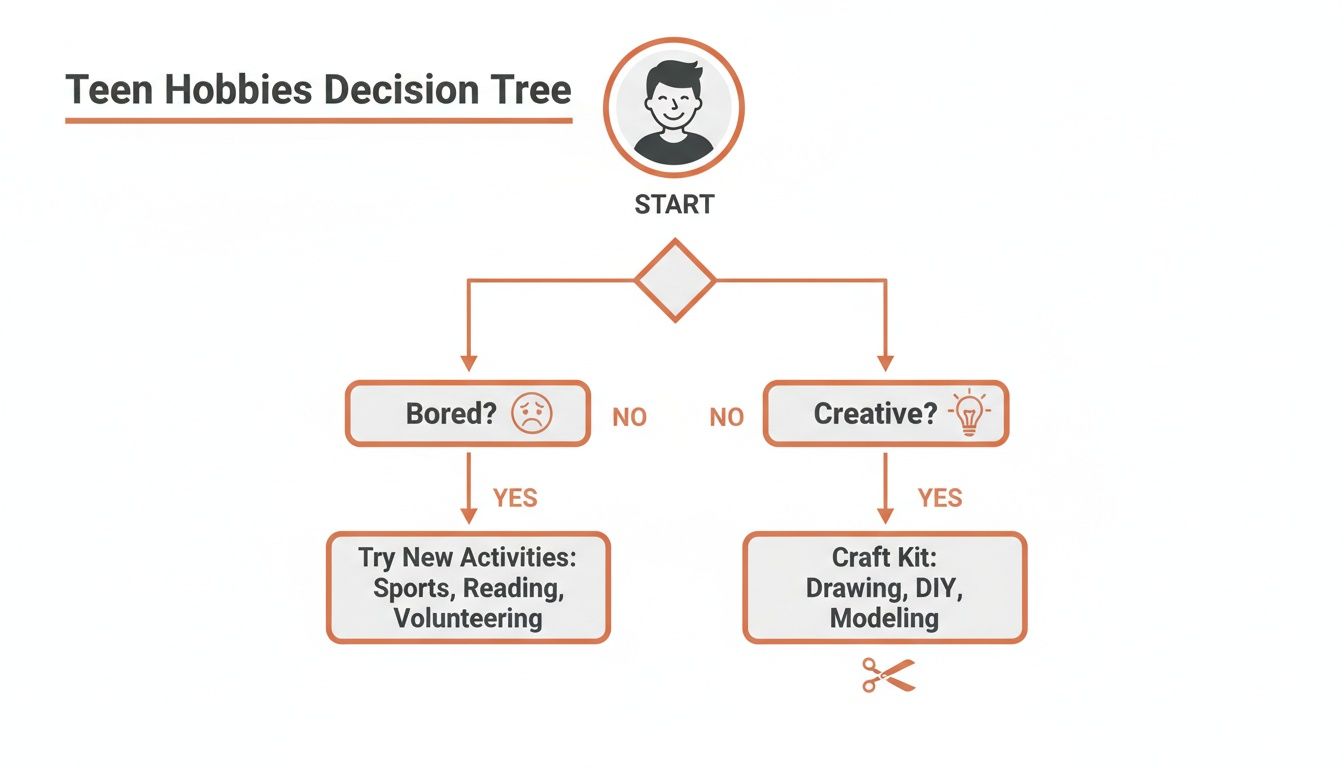
This flowchart illustrates how a desire for a hands-on, creative activity naturally leads to crafting as an ideal screen-free option.
How to Choose the Right Craft Kit for Your Teen
This comparison table breaks down popular craft types by interest, time commitment, and skill development to help you make an informed choice.
| Craft Type | Best For Teens Who... | Average Time to Complete | Key Skills Learned |
|---|---|---|---|
| Leathercraft | ...are into fashion, want a high-end result, and enjoy detail. | 3–5 hours | Hand-stitching, pattern following, material handling (leather). |
| Plastic Canvas | ...love retro vibes, pixel art, and want a quick, satisfying win. | 1–2 hours | Basic stitching (tent stitch, whipstitch), color theory, 3D construction. |
| Embroidered Patch | ...love to personalize their clothes, bags, and accessories. | 2–4 hours | Embroidery stitches (satin stitch, backstitch), design transfer, creative expression. |
The optimal kit is one that aligns with their curiosity. Whether the goal is a durable accessory or a quick, colorful keychain, a suitable project exists.
Leathercraft Kits for the Budding Designer
Working with leather offers a sophisticated crafting experience. For a teen interested in fashion, a DIY leather kit provides a pathway to creating a durable, stylish, and professional-looking accessory, such as a wallet, bag, or keychain.
The primary appeal of these kits is the high-quality final product. A kit like Stitch Mingle’s all-inclusive bag kit is an excellent entry point, featuring pre-cut and pre-punched leather pieces that eliminate the most challenging steps and allow the crafter to focus on the satisfying process of assembly.
A great leathercraft kit is like a blueprint for confidence. It teaches teens a classic skill while letting them create something that's both timeless and uniquely theirs.
Plastic Canvas Kits for Quick, Colourful Fun
For teens who appreciate retro aesthetics and projects with rapid completion times, plastic canvas kits are an ideal choice. This craft combines elements of cross-stitch and pixel art, using a rigid plastic grid and yarn to create sturdy, vibrant items like keychains, coasters, or small boxes.
The significant advantage is speed; most plastic canvas projects can be completed in one session. This is a key factor for maintaining engagement, with these kits being a top choice for 25% of teen crafters due to their sub-two-hour completion time.
Embroidered Patches for Ultimate Self-Expression
For teens focused on personalization, embroidered patch kits are an excellent medium. These kits provide all the necessary materials to create unique iron-on patches for customizing jackets, backpacks, and other apparel. It's a low-commitment introduction to the art of embroidery.
The process is accessible to beginners yet offers ample room for creative growth. Crafters can start with a basic design and incorporate more complex stitches to add texture and detail. The result is wearable art that is a true reflection of their personal style.
Curious about embroidery? Check out our guide on: embroidery kits for beginners to get all the details on starting this timeless craft.
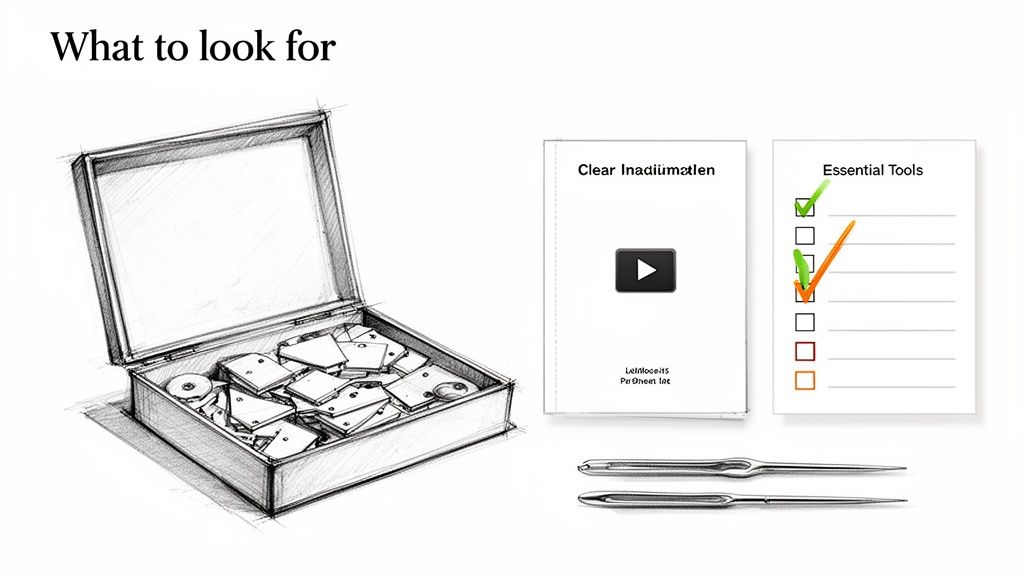
What to Look for in a High-Quality Craft Kit
A superior craft kit can inspire a lifelong hobby, whereas a poorly designed one can lead to frustration. The key difference lies in the kit's design, which should be structured to ensure a successful outcome for the user.
An effective analogy is a meal-kit delivery service. The best services provide pre-portioned ingredients and a clear recipe, allowing you to focus on the enjoyable cooking process. High-quality craft kits for teens operate on the same principle.
A well-designed kit provides all necessary components from the outset, eliminating the need for additional trips to a craft store and allowing the project to proceed without interruption.
All-Inclusive and Ready to Go
The most critical feature is that the kit is all-inclusive. A missing tool, such as a specific needle or clasp, can halt creative momentum. A complete kit removes this potential obstacle.
A comprehensive kit should include:
- Pre-cut materials: This saves significant time and reduces frustration, particularly in crafts like leatherworking where cutting can be difficult.
- All necessary hardware: Every ring, clasp, zipper, or stud required for full functionality should be included.
- The right tools and supplies: The kit must contain the correct needles, thread, and any specialized tools required for the craft.
Crystal-Clear Instructions
Confusing instructions can quickly derail a project. A top-tier kit must include instructions that are easily understood by a novice.
The gold standard for instructions is a multi-format approach. Look for kits that provide both a printed guide with clear diagrams and access to step-by-step video tutorials. This dual-media method accommodates different learning styles.
Visual demonstrations of techniques, such as how to perform a specific stitch or attach a component, are significantly more effective than text-based descriptions alone.
Quality Materials for a Polished Finish
Finally, the quality of the materials directly impacts the final product. Durable, high-quality materials result in a finished item that the teen will be proud to use or display, enhancing the sense of accomplishment.
A thoughtfully curated kit, such as those from Stitch Mingle, uses quality components that contribute to a polished, professional-looking result. This focus on quality improves the crafting experience and ensures the final piece is impressive, encouraging further creative pursuits.
How to Make Your First Leather Craft Project: A Step-by-Step Guide
This section provides a technical walkthrough for your first leather project using a simple leather keychain kit as a model. This tutorial is designed to demystify the process and build confidence in your crafting abilities.
Step 1: Prepare Your Workspace and Kit Components
Begin by clearing a flat, stable work surface. Unpack your craft kit and organize all components for easy access. Familiarize yourself with each item.
- Leather Pieces: These should be pre-cut to shape with stitching holes already punched.
- Hardware: Identify all metal components, such as the keyring, clasps, or decorative studs.
- Needles and Thread: Note that these are heavier gauge than standard sewing supplies, specifically designed for leather.
Proper preparation, or "mise en place," ensures a smooth workflow, allowing you to focus on the crafting process.
Step 2: Master the Basic Saddle Stitch
The saddle stitch is the foundational technique for hand-sewn leather, known for its durability and professional appearance.
The most effective way to learn this stitch is by watching a video tutorial. It will demonstrate the two-needle technique, where each needle (attached to opposite ends of a single thread) passes through the same hole from opposite directions.
Technical Tip: The key to a professional-looking seam is consistent thread tension. Apply a uniform pulling force to each stitch to create a clean, even line.
If your kit includes a practice piece of leather, use it to perform several stitches. This will help you establish a rhythm and refine your tensioning before working on the final product.
Step 3: Assemble the Keychain
This is the construction phase. Begin by aligning the pre-punched holes on your leather pieces as indicated in the instructions.
Follow this sequence:
- Initiate Stitching: Start at one end of the seam, making your first stitch and leaving a small thread tail.
- Continue the Seam: Proceed along the seam using the saddle stitch. The pre-punched holes ensure perfect spacing.
- Integrate Hardware: At the designated point in the instructions, loop the leather through the keychain ring or clasp before continuing your stitching.
- Finish the Seam: Complete the final stitches and secure the thread. Most guides will instruct you to backstitch over the last two or three holes to lock the thread in place and prevent unraveling.
Step 4: Apply Professional Finishing Touches
The final step, known as burnishing, elevates the project from "homemade" to "handmade." This process smooths and seals the raw edges of the leather. Some kits include gum tragacanth and a wooden burnishing tool for this purpose.
Apply a small amount of gum tragacanth to the leather's edge. Then, use the wooden tool to rub the edge briskly. The friction generates heat, which seals the fibers and creates a smooth, durable finish.
Once burnishing is complete, trim any excess thread. You have now completed your first leather project.
For those interested in advancing their skills, learn more about how to sew leather by hand in our comprehensive guide covering advanced techniques.
How to Host an Unforgettable Teen Craft Party
A craft party offers a creative and social alternative to conventional teen gatherings. Participants leave with a tangible, self-made item, which serves as a memorable party favor. With proper planning, hosting such an event is straightforward.
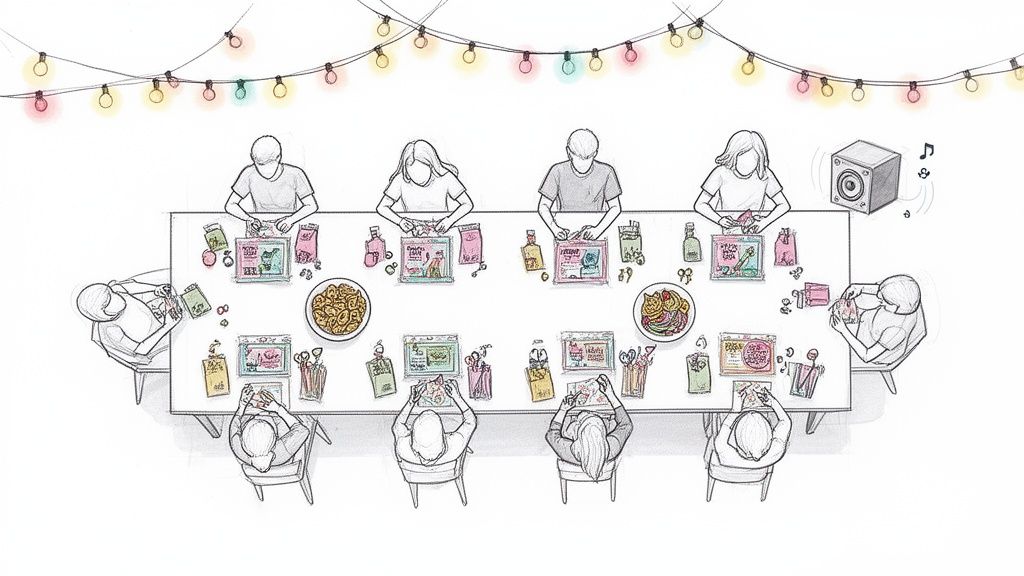
The key to success is selecting a project that is engaging yet achievable within the party's timeframe. Using craft kits, especially those available in bundles, is an effective strategy for managing supplies and ensuring a positive experience for all guests.
Planning Your Craft Party Step by Step
A structured approach to planning will ensure a smooth and enjoyable event.
-
Choose a Theme and Project: Establish a central concept. A patch-decorating station for denim jackets or a keychain-making bar with various designs are popular options that allow for high levels of personalization.
-
Simplify with Craft Kit Bundles: Managing individual supplies for a group is inefficient. Craft kit bundles provide each guest with a self-contained package of all necessary materials, minimizing mess and logistical complications.
-
Set Up a Functional Crafting Space: A large, well-lit table is essential. Ensure adequate space for each participant. Using a disposable tablecloth will significantly simplify post-party cleanup.
Creating the Perfect Party Atmosphere
The environment is as crucial as the craft itself. The goal is to foster a relaxed, collaborative atmosphere where creativity can flourish.
The objective of a great craft party is not technical perfection but the shared experience of creating together. The atmosphere should be low-pressure, where experimentation is encouraged and mistakes are part of the fun.
-
Music and Snacks: A curated playlist of the teens' preferred music can set a positive tone. Opt for non-greasy finger foods like popcorn, pretzels, fruit skewers, and cupcakes to avoid soiling the craft projects.
-
Encourage Collaboration: Arrange supplies centrally to facilitate sharing and interaction. A welcoming environment supports all skill levels, from novice to experienced crafter. The social connection is the primary goal; the craft is the medium.
Explore our craft kits for your next party:
- Leather Keychain Kits
- Embroidered Patch Kits
- Plastic Canvas Kits
Got Questions? We’ve Got Answers.
Embarking on a new hobby naturally brings questions. This section addresses the most common inquiries from parents and teens about craft kits.
What’s the Right Age for These Craft Kits?
Most of our kits, including leather keychains and embroidered patches, are designed for ages 12 and up.
However, suitability is more dependent on an individual's interest level and ability to focus than on chronological age. Enthusiasm for the project is the greatest predictor of success.
Beginner-level kits with pre-cut components and video tutorials are ideal for younger teens. For any projects involving sharp tools like needles, adult supervision is recommended until the user is comfortable and proficient.
The secret is to pick a project that genuinely sparks their interest. When a teen can’t wait to show off their finished bag or a custom patch, they’re way more likely to enjoy the creative process and see it through.
My Teen Gets Frustrated Easily. Are These Kits Hard?
This is a common concern. Our kits are engineered to be frustration-free by simplifying the most challenging aspects of the craft.
Look for kits with these features:
- Pre-cut and pre-punched materials: This eliminates complex measuring and cutting, a common point of failure in many projects.
- Step-by-step video tutorials: These allow teens to learn at their own pace, with the ability to pause and rewind as needed.
- Beginner-friendly projects: Starting with a small, quickly completed project like a keychain builds confidence for more complex future endeavors.
Will We Need to Buy Extra Tools or Supplies?
While this varies by brand, a high-quality all-in-one kit should contain everything needed to start immediately.
Brands like Stitch Mingle pride themselves on including every necessary component: all pre-cut materials, hardware, needles, and thread. This all-inclusive approach makes them excellent for gifts and allows creativity to begin without delay.
What Are the Real Benefits of Crafting for a Teen?
Crafting is a valuable developmental activity with benefits extending beyond simple entertainment.
Crafting helps teens:
- Develop fine motor skills and hand-eye coordination through precise tasks like stitching.
- Strengthen problem-solving abilities by following instructions and overcoming minor challenges.
- Cultivate patience and focus by seeing a project through to completion.
- Gain a significant self-esteem boost from the accomplishment of creating a tangible item.
It is also an effective, screen-free method for stress reduction and mindfulness. Crafting provides a healthy outlet for self-expression, resulting in a product they can be genuinely proud of.
Ready to find that perfect project? Check out the full collection of beginner-friendly kits at Stitch Mingle and kickstart a fun, stylish, and rewarding new hobby.
Find Your Next Creative Project at stitchmingle.com
See also:
